Compression Marks

j4yt33

Member
Hi,

Just wondering if anyone else has to deal with compression marks.

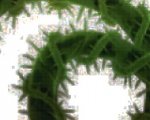
I have tried to attach screenshots of examples of what I mean. Hopefully you can see a before image (green plane with white background), and an after image (dark green plant with a multicolour halo). These are the same image, I have just adjusted the Darkness in Photoshop to exaggerate what I am talking about.

These multicoloured Pixels are between 1% and 3% of CMYK. They should not be there as it should just be a solid white background.

I believe they are created once saved down as a JPEG. Unfortunately this is how we receive the artwork.

As you can imagine, if we created plates as supplied, the final printed image would look very dirty.

We seem to be forever tidying up this issue.

Is there a simple fix that we do not know about? Photoshop Plugins? Esko Plugins?

Any advice would be extremely appreciated.

Many Thanks
James
 

Attachments

  • Screen shot 2015-01-08 at 11.36.44.jpg
    Screen shot 2015-01-08 at 11.36.44.jpg
    13.4 KB · Views: 271
  • Screen shot 2015-01-08 at 11.36.36.jpg
    Screen shot 2015-01-08 at 11.36.36.jpg
    18.1 KB · Views: 234
That's a classic Garbage In- Garbage Out scenario.
Without having the original image to compare, you are making an assumption that it is an artifact of a maximum jpeg compression (probably correct) - however, it maybe the quality of the original image capture as well.
Simple fix - get better/original image to evaluate.
Laborious fix - clean-up manually in image editing software and charge accordingly.
Unknown fix - If someone has a 'magic' button or simple procedure to clean these artifacts. (I know this is what you are asking for...and I would be interested as well if other forum folks have ideas as well...I don't know of a way, besides blowing the highlight detail away by selective masking and possible curve adjustments....)
 
I am making that assumption based on a number of tests saving certain images as different formats, also on the basis that the image is a digital illustration.

I'm just curious to see how other people deal with this problem (if at all), as I can't imagine we are the only company that has to deal with this issue.

I am seeing the customer next week and am hoping to either prevent the issue happening in the first place, or if he receives the images this way, give him a fix solution to save us time and therefore him money.
 
Well......there is some "secret sauce"... ;-)

I took both your images.

First the "Before"

Before_zps3415aa48.jpg


Here's the "After"

After_zpsfffdb35c.jpg


You can download the "After" and darken it again the way you did the first time to see if the artifacts have been sufficiently removed.
I "fixed" the one that you exaggerated to show how strong the relatively simple secret sauce is.

Of course it's always better to have an original that doesn't have the problem - but that's not always possible.

If this is helpful then go to my blog to see how it's done and make a donation!

The Print Guide: Fixing art for the web so that it can be used for print
 
Last edited:
I tend to use a Levels adjustment in Photoshop, dragging the white point in a little. It's destructive, as you're bleaching out highlight detail along with the artifacts, but usually, images with this problem are pretty poor in the first place, so it's not so critical.
 
Those aren't compression marks. Those are compression artifacts from using JPEG compression. Gordo's article is great.
 
I tend to use a Levels adjustment in Photoshop, dragging the white point in a little. It's destructive, as you're bleaching out highlight detail along with the artifacts, but usually, images with this problem are pretty poor in the first place, so it's not so critical.

The problem with doing it that way is that you are globally changing the tonality and it only applies to light jpeg artifacts. The secret sauce method deals with jpeg artifacts irrespective of color and without altering tonality.
 
My sauce uses different ingredients, however it is just as secret! :]

Do you receive native files/linked images or only PDF files?


Stephen Marsh
 
Thank you for all your replies.

Gordo, thank you for your link. Please could you tell me the smart blur values you used? I understand it is a bit of a trial and error thing, but I can't seem to get anywhere near your final images. I just get a dirty haze around everything with blurring in the images. :confused:

My sauce uses different ingredients, however it is just as secret! :]

Do you receive native files/linked images or only PDF files?


Stephen Marsh

We tend to receive the artwork as one big flattened psd file. Once tidied up, we would then use this image as a linked image within our Illustrator document.
 
We tend to receive the artwork as one big flattened psd file. Once tidied up, we would then use this image as a linked image within our Illustrator document.

Attached is a Photoshop action created in CS6.

One action clips/removes all tones under 3%.

The other action clips/removes all tones under 5%.

No other tones are affected.

Don’t use if there is wanted detail in the 3-5% tone range.

I have another different approach if this is no good.

There is a smart blur filter step in there, however it is disabled as the arbmap curve will hopefully do the job. If not, simply click on the left hand side tick icon of the last smart blur step to activate it. If you don’t wish the dialog to pop up asking for image specific settings, then toggle the dialogue icon on the left hand side off (when actions viewed in list mode, not button mode).

You will need to test, let me know if any settings need to be tweaked.


Stephen Marsh
 

Attachments

  • Clean JPEG Compressed Whites.zip
    2 KB · Views: 234
Last edited:
Smart Blur JPEG Compressed Whites action attached.

Compare results to previous action. Pick which works best for the image at hand!


Stephen Marsh
 

Attachments

  • Smart Blur JPEG Compressed Whites.zip
    1.1 KB · Views: 228
Whiten JPEG Compressed Whites action attached.

Compare to the previous 2 actions and use the one that works best for a given image.


Stephen Marsh
 

Attachments

  • Whiten JPEG Compressed Whites.zip
    1 KB · Views: 235
Thank you all for your feedback. I have tried out all your techniques with very mixed outcomes.

After my meeting with the client, it turns out their artwork is perfect! They do their artwork within InDesign with many linked images making their finished artwork huge in file size.
Once they have completed their art they export it to a more manageable sized pdf. This is the point the jpeg compression artifacts appear.

I have suggested I take one of their pre exported files and have a tweak of the export setting to see if I can achieve better results.
After hours and hours of testing, I don't seem to be any closer to my goal.

Can anyone suggest any Export setting that will downsize the file without compromising the quality (the dream i know). Ideally to pdf format unless you can suggest another format that we can still use within Illustrator.

The idea is to save the settings as a profile and give to the client for all future artworks.

Any help would be extremely appreciated.

Many thanks
James
 
Try choosing ZIP compression rather than JPEG. The files may be a tad larger, but there will be no JPEG artifacts (unless they already exist in the placed image)
 
I just usually cut to the chase and tell them use .zip compression in the PDF export settings because it's lossless. Trying to walk some people through menu items can be as painful as talking to my mom over the phone trying to fix her computer problems.

Anywho, the default High Quality Print and PDF/X export options are usually good enough. The only other thing to remember is bleed/marks settings need to be manually entered. Save preset.
 
JPEG2000, Maximum quality JPEG. But really, as others have said, ZIP is what want if you want lossless compression. Just understand that file sizes will go up.
 
Thank you all very much for your advice.

Zip worked a treat! I was concerned the image size would have been too large, but it turns out exporting this way (the correct way) gives me a file 3mb bigger than the clients exported (the wrong way) file.

Cheers again guys!
 

PressWise

A 30-day Fix for Managed Chaos

As any print professional knows, printing can be managed chaos. Software that solves multiple problems and provides measurable and monetizable value has a direct impact on the bottom-line.

“We reduced order entry costs by about 40%.” Significant savings in a shop that turns about 500 jobs a month.


Learn how…….

   
Back
Top