Avoid this cut problem on spines of books with guillottine

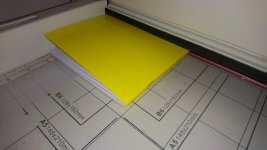
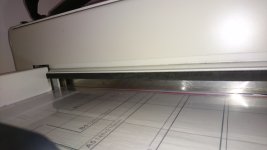
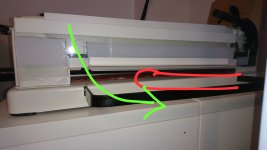
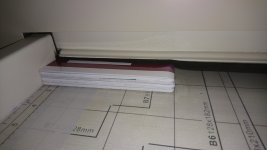
Hello, I'm having this issue with my guillottine, each time I have more than one piece to cut the border near the spine get crushed with a prolonged hairy piece of cover hanging out.

My professor at university is telling me to search for a solution I'm not sure if is a matter of pressure, paper count, dull blade or so on.

Can you professionals help me to understand what is going on so that I can learn?

PS: maybe it's a dumb question, in case if was already discussed can you link me the thread? Also theres's a section with educational topic to avoid common errors? thanks
 

Attachments

  • 20240628_183339.jpg
    20240628_183339.jpg
    306.7 KB · Views: 28
Well, looks like you don't have any squaring on the spine. That's gonna make it hard to fix. OR is it supposed to be more square than the pic shows? To avoid crushing the spine, use magnetic pads on the false clamp, and leave a space in the pad an inch short of the spine. So that the flat of the pages have pressure, but the spine does not. (Or much less)
For the tail.. Ensure the blade is fresh sharpened. AND the cut stick has a fresh surface. Can still happen. The number one fix would be lamination. The film would hold the edge of the cover for a cleaner cut. That adds to the cost, so maybe not feasible. Another thing to try is to place a sheet of scrap cover weight under the block to cut. Between the stock and the cut stick. Can make a big difference.
You will have to figure out the pressure.. Too much and you may still crush the spine. Too little and you risk slippage. Dull blade and it'll "pull" the block causing a concave or angled cut. ~3 Cents worth..
 
First of all thank you so much for your kind reply.

Regarding the spine, do you mean squared saddle-stich finishing? I'm doing normal saddle stitches, I don't have access to a square saddle stitch machine.

To avoid crushing the spine, use magnetic pads on the false clamp, and leave a space in the pad an inch short of the spine.

Can you link me some more material on the matter? I don't know this magnetic pads, do you have pictures or photos of this procedure? The false clamp is the clamp that goes down to keep the sheets together ?

I do the lamination part on the cover, maybe the part being ripped off is the guts of the book rather than the cover and during crushing takes a bit of the cover with it too.

I saw that this happens more if I cut more than one book together.

If I do one book only the result is neat and clean. If I do more than one the effect of ripping is enhanced.

Probably pressure wise I'm applying too much of pressure when cutting multiple pieces at once.

Thanks in advance.
 
Sadly we are in a small educational lab we have this piece of gear that is far tons of miles from a professional equipment.

I think the actual squaring of the piece is so bad that I can't cut first then saddle, I guess that my only option is saddle, put them under pressure and cut the pieces once they are already binded.
 

Attachments

  • DSC_5153.JPG
    DSC_5153.JPG
    2.4 MB · Views: 21
Can you link me some more material on the matter? I don't know this magnetic pads, do you have pictures or photos of this procedure? The false clamp is the clamp that goes down to keep the sheets together ?
If the clamp has a flat face pressing down, the flat steel plate is called a false clamp. If you look/ feel under the clamp and you feel finger like surfaces, you do not have a "false" clamp. Used to prevent the finger like castings leaving their impressions. The pads will work either way.

Magnetic Cutting Pads​


The Blue Lightning Magnetic Cutter Pad is a high density foam pad with a magnetic backing that allows you to easily attach it to the clamp of your paper cutter to eliminate any marking from the clamp's fingers Especially effect when cutting NCR and other carbonless paper stocks. Two 3" x 15" pads per package. Custom sizes available, too. Just ask.

$32.00/pkg​
 
If I do one book only the result is neat and clean. If I do more than one the effect of ripping is enhanced.
AHH.. I see your cutter is not as I imagined it.
Your main problem is the curvature of the spine. I hope you are facing the spine into the cut. Not away. The spine should be contacting the blade first.
 
If the clamp has a flat face pressing down, the flat steel plate is called a false clamp. If you look/ feel under the clamp and you feel finger like surfaces, you do not have a "false" clamp. Used to prevent the finger like castings leaving their impressions. The pads will work either way.

Magnetic Cutting Pads​


The Blue Lightning Magnetic Cutter Pad is a high density foam pad with a magnetic backing that allows you to easily attach it to the clamp of your paper cutter to eliminate any marking from the clamp's fingers Especially effect when cutting NCR and other carbonless paper stocks. Two 3" x 15" pads per package. Custom sizes available, too. Just ask.

$32.00/pkg​
they put a rubber fluffy strip under the clamp, however it isn't flat, it is about 1/2 inch wide (see picture).
AHH.. I see your cutter is not as I imagined it.
Your main problem is the curvature of the spine. I hope you are facing the spine into the cut. Not away. The spine should be contacting the blade first.
I think it does i'm putting the spine this way (yellow notebook).
 

Attachments

  • DSC_5157.JPG
    DSC_5157.JPG
    3 MB · Views: 14
  • DSC_5156.JPG
    DSC_5156.JPG
    2.2 MB · Views: 14
Sorry to say, you may have to cut one at a time for best result.
In this line of work, it often appears to be simple and easy, but one finds that there are a thousand little details to watch out for. The nature of the biz.
 
they put a rubber fluffy strip under the clamp, however it isn't flat, it is about 1/2 inch wide (see picture).

I think it does i'm putting the spine this way (yellow notebook).
OK.. The cutting blade should be moving horizontally a little. (Or angling downward) From the yellow note book picture.. Does it move from the right to left looking from this angle. ? It seems to have a very flat profile.
Odds are, in this example, holding the book flat, including the spine, is probably giving you the best result. When you stack 2 or more, it is more difficult to get a clean cut on the curved spine.
 
It looks wrong to me put the spine to the guide so it cuts first not last.
It isn't the position of the spine (red) being outside be cut first with the blade direction in green be that way? Am I wrong? should I reverse the direction of the spine?

thanks
 

Attachments

  • IMG-20240628-WA0020.jpg
    IMG-20240628-WA0020.jpg
    104.9 KB · Views: 16
It isn't the position of the spine (red) being outside be cut first with the blade direction in green be that way? Am I wrong? should I reverse the direction of the spine?

thanks
That looks correct. Yep. Your cutter needs upgrading! :unsure:
20 to 30 thousand should get you a nice used machine. (y) /joke, but not really.
 
this is what happens when I put more of one book together, the rubber part curves a bit to hold together the books.
 

Attachments

  • DSC_5162.JPG
    DSC_5162.JPG
    2.7 MB · Views: 15
this is what happens when I put more of one book together, the rubber part curves a bit to hold together the books.
But that's not enough. I suspect your blade is too dull. When was it honed last? The picture of the trailing tail points to dull blade.
Try pushing the books spine side, all the way to the edge of the platform, into the leading edge of the blade. Is there a flat side side/edge of the platform to push against? Don't know what else to say, except Bill's suggestion.. Trim the tops and bottoms flat first, then saddle stitch and face trim. You might need to create a custom sheet size to print this way.
 

Attachments

  • Capture.JPG
    Capture.JPG
    64.6 KB · Views: 19
But that's not enough. I suspect your blade is too dull. When was it honed last? The picture of the trailing tail points to dull blade.
Try pushing the books spine side, all the way to the edge of the platform, into the leading edge of the blade. Is there a flat side side/edge of the platform to push against? Don't know what else to say, except Bill's suggestion.. Trim the tops and bottoms flat first, then saddle stitch and face trim. You might need to create a custom sheet size to print this way.
not sure actually when it was honed last time, it seems they always use the same format so maybe moving the notebook a bit more on a side with a rectangular padding could help.

I know the challenger guillottines however we are a small lab for learning purposes. Could be an idea bring this gear to a grinder and have this honed by them.

Given the weight we can move the entire equipment and have it removed and handled by them in order to not have us risk for the removal procedure cause we are not so expert in this, myself time ago was risking to have a finger cut.
 

PressWise

A 30-day Fix for Managed Chaos

As any print professional knows, printing can be managed chaos. Software that solves multiple problems and provides measurable and monetizable value has a direct impact on the bottom-line.

“We reduced order entry costs by about 40%.” Significant savings in a shop that turns about 500 jobs a month.


Learn how…….

   
Back
Top