increasing solid densities in inkjet proofs part 1

beanz

Member
Good Day!

is there a way to increase solid densities in digital proofs? i am asking this because we are exploring setting in-house densities for process colors in our press room. If we so decide to increase certain ink densities (to extend the gamut of the press), how can we make the proofer output higher solid densities in order to match our boosted densities in press?

it is my observation that currently our proofer is outputting consistent control bar colors when we make our proof. we are using epson 9900 and metadimension.
 
First thing to keep in mind is that an inkjet is not a press. :] Although some RIPs do talk about density when calibrating, it is more about the colorimetric behaviour of the inkjet/resolution/paper.

This is a function of your inkjet proofing RIP software, setting the base density and linearization.

When a “proof” is printed without a simulation (colour management off), you are getting the base behaviour of the inkjet – which may or may not achieve the target densities of the press… however: keep in mind is that it is not so much about the density, as it is the CIE L*a*b* values of the target (press) and the source (base inkjet behaviour). If the source (inkjet) is wider than the target (press), then the press can be simulated using colour management.

So, the proofer may already be capable of creating the colours you need (inkjet/resolution/paper) – all you may need to do is change the simulation profile that sits in front of the inkjet/media profile in the processing pipeline of your proofing RIP.


Stephen Marsh
 
Last edited:
First thing to keep in mind is that an inkjet is not a press. :] Although some RIPs do talk about density when calibrating, it is more about the colorimetric behaviour of the inkjet/resolution/paper.

This is a function of your inkjet proofing RIP software, setting the base density and linearization.

When a “proof” is printed without a simulation (colour management off), you are getting the base behaviour of the inkjet – which may or may not achieve the target densities of the press… however: keep in mind is that it is not so much about the density, as it is the CIE L*a*b* values of the target (press) and the source (base inkjet behaviour). If the source (inkjet) is wider than the target (press), then the press can be simulated using colour management.

So, the proofer may already be capable of creating the colours you need (inkjet/resolution/paper) – all you may need to do is change the simulation profile that sits in front of the inkjet/media profile in the processing pipeline of your proofing RIP.


Stephen Marsh

Run the press at the higher SIDs. Profile that press condition. Use the profile to have the proofer simulate that print condition?
 
Run the press at the higher SIDs. Profile that press condition. Use the profile to have the proofer simulate that print condition?

Exactly Gordo (ideally averaging multiple sheets from multiple runs).

The base printer/resolution/paper profile may cover the gamut of the higher SID press condition, without having to establish a new/different baseline inkjet condition using higher ink limits (which can be problematic). Usually the inkjet is setup for the resolution/media/passes with the highest ink settings that do not lead to visual artefacts or drying problems etc. The inkjet profile is usually as good as it gets (who wants to do this twice?). It is usually all about the press simulation profile.


Stephen Marsh
 
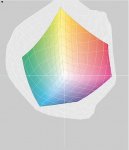
If the proofing RIP does not offer 3D profile/gamut comparisons between the proofer profile and the press simulation profile, then one can use ColorSync on the Mac or a free ICM gamut viewer on MS Windows. Screenshot attached, the ghosted gamut plot is a “full gamut” semi-matte proofing stock on the 9900, the inner gamut plot is the target ISO Coated v2 (BasiCColor), which is fully contained by the proofer gamut (except for some near dmax shadow values).

One can also use reporting tools in various colour/profiling apps to compare readings of charaterization charts, comparing the press sheet data to the raw proofer state and or the simulated press condition on the proofer.


Stephen Marsh
 

Attachments

  • 3D-Gamuts.jpg
    3D-Gamuts.jpg
    73 KB · Views: 179
Last edited:
beanz

The basic answer to your question is yes.

Except you may not even need to -- alter any inking settings in your Epson, that is.

Fact is that it's my contention -- kept pretty much to myself -- that industry standard litho single ink densities are set ridiculously low, in an effort to make printing a commodity. (And myself, I've never understood why printers who work so hard to make their product a commodity are shocked why buyers expect commodities-type pricing.)

But anyway...

The gamut of your 9900 even with pretty conservative ink settings dwarfs Gracol or SWOP, or Fogra, or whatever. You can increase your press ink densities by quite a bit before you even come close to getting out of its gamut.

(This by the way is something I'd love to work on. I'd love to see what's possible on a litho press if someone really want to push out and quantify the edges.)


Mike Adams
Correct Color
 
Fact is that it's my contention -- kept pretty much to myself -- that industry standard litho single ink densities are set ridiculously low, in an effort to make printing a commodity. (And myself, I've never understood why printers who work so hard to make their product a commodity are shocked why buyers expect commodities-type pricing.)

But anyway...

The gamut of your 9900 even with pretty conservative ink settings dwarfs Gracol or SWOP, or Fogra, or whatever. You can increase your press ink densities by quite a bit before you even come close to getting out of its gamut.

(This by the way is something I'd love to work on. I'd love to see what's possible on a litho press if someone really want to push out and quantify the edges.)


Mike Adams

I used to train printers how to get to maximum CMYK densities: The Print Guide: Printing at DMaxx - maximizing the CMYK gamut

There is a limit because as SIDs increase gamut also increases - up to a point - then the gamut decreases.

Standard litho SIDs were established as a common target that any printshop in reasonable mechanical condition could achieve. That, coupled with linear film as the common file interchange format meant that print buyers could go to any shop and have a reasonable expectation that their expectations (defined by the standardized proof) could be met in the presswork.

With CtP and inkjet proofing, printshops acquired the ability to establish multiple shop standards rather than just aligning to the industry standard. Some took that path - most did not leverage that opportunity. Most printers tend not to be innovators.
 
Gordo,

I read that guide of yours years ago it seems. It's good stuff. I'd love to work with some printer who wanted to crawl out of the commodification box to do pretty much what you've outlined, and see just how much larger of a gamut than the industry standards can be achieved.

That, coupled with linear film as the common file interchange format meant that print buyers could go to any shop and have a reasonable expectation that their expectations (defined by the standardized proof) could be met in the presswork.

Yeah, a commodity.

With CtP and inkjet proofing, printshops acquired the ability to establish multiple shop standards rather than just aligning to the industry standard. Some took that path - most did not leverage that opportunity. Most printers tend not to be innovators.

That's so damn diplomatic I got a good chuckle out of it.

But if any printer ever does want to innovate, and to leverage opportunity, I'd love to help them do it.


Mike
 

PressWise

A 30-day Fix for Managed Chaos

As any print professional knows, printing can be managed chaos. Software that solves multiple problems and provides measurable and monetizable value has a direct impact on the bottom-line.

“We reduced order entry costs by about 40%.” Significant savings in a shop that turns about 500 jobs a month.


Learn how…….

   
Back
Top