• Best Wishes to all for a Wonderful, Joyous & Beautiful Holiday Season, and a Joyful New Year!

help neede on how to design a huge wallpaper for a room wall ( 6 x 4 Meters )

ramikh86

New member
hello
not sure if it's the right place to post this thread.

i want to design a wallpaper for a room with a picture of a forest as a background, the forest image size is 7264 x 5440 Pixels @ 300 DPI.

dimensions of the room wall are:
width : 6 Meters and Height : 3.8 Meters

if i enlarge the forest picture to (6 x 3.8 meters ) how to avoid losing quality? i can't find any other high resolution pictures...

what resolution (DPI) should i use when designing the wallpaper ?

when i make a new project ( 6 x 3.8) using 300 dpi in photoshop first photoshop says it's too large
and the file size become 8 GB! and if using 150 dpi the file become 2 GB still too large.

the room is small and the viewing distance will be short and i don't want the wallpaper to look pixeled..

do you advice slicing the whole design into 3 or 4 parts and design every part by it self.

or do you advice designing the wallpaper using the half of the real size ( 3 x 1.9 Meters ) then the printing company can enlarge the design into the original size.

any suggestions ?

Thanks
 
Last edited:
For inkjet printing I don't think you need anything higher than 72dpi at the final size. Why not do a small test print of a sample area using different dpi? E.g. 150 dpi, 100dpo, 72 dpi, 60 dpi, and 48 dpi.
 
thanks gordo
i think this is the best thing to do i hope the printing press will let me print samples.

but how to deal with the large image file? i have 8 GB RAM and still it's so slow.
don't tell me to upgrade my pc hehe
 
150dpi would be as low as you want to go, see what size the media will be on the printer, then tile it evenly, ie, 6 meters on a 1200 wide printer = 5 pieces, or upgrade your pc and save it as one image and let the rip that prints it tile it with a bit of overlap.
 
Hi Ramikh,

This is an interesting one, I've done some calculations on how much you'd have to enlarge the image by in order for it to cover the whole space.

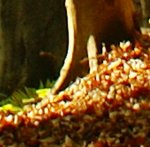
The image would have to be 17700px wide and would therefore need enlarging by 243%.

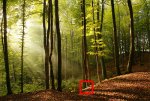
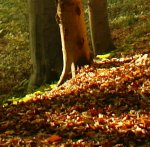
I found this image below which is of a similar size to the one you have around and have made the adjustments so you can see how much quality would be lost in this example.

Whole image.

full-image.jpg

Image at 100%

100%.jpg

Image at 243%

243%.jpg

I hope that helps.
 
Hi Ramikh,

This is an interesting one, I've done some calculations on how much you'd have to enlarge the image by in order for it to cover the whole space.

The image would have to be 17700px wide and would therefore need enlarging by 243%.

I found this image below which is of a similar size to the one you have around and have made the adjustments so you can see how much quality would be lost in this example.

Whole image.

View attachment 4149

Image at 100%

View attachment 4150

Image at 243%

View attachment 4151

I hope that helps.

pixeled :( thanks man
maybe changing all the image into vector will help
 
thanks gordo
i think this is the best thing to do i hope the printing press will let me print samples.

but how to deal with the large image file? i have 8 GB RAM and still it's so slow.
don't tell me to upgrade my pc hehe

Flatten and rasterize the image. That should reduce the file significantly. Also, save as a post script, then import into distiller. Distiller will auto-generate a new, smaller PDF for you.
 
bring your raster *.jpg image into illustrator and utilize the software's "live-trace" function … this will vector the image completely. remember to expand after the trace has completed. and, depending if wall is colored … you might even decide on removing blue-sky background of image … so the painted wall can appear as background.

when opening illustrator, their cs6 version offers a work-space titled "tracing" … one of the palettes docked is called "image-trace". experiment with downsized 72dpi-image … then increase resolution to original native-size. illustrator can handle the size … 6m x 3.8m comes to appx 227in x 150in

there's an amalgamation of settings in live-trace … that's why i suggested using small image first … remember to document the settings by utilizing snapshots and notepad/textedit utility. you may consider high-fidelity with full-tonal repro … increase colors-used to 100ct(maximum i believe) … abutted paths.

check with your local screen-shop as to whether they can work with an *.ai or *.eps or *.pdf file.

and when you make your first million … remember us.

edit: remember vector can increase in dimensions without losing sharpness … so enlarge "proportionately" to the size you wish.
 
Last edited:

PressWise

A 30-day Fix for Managed Chaos

As any print professional knows, printing can be managed chaos. Software that solves multiple problems and provides measurable and monetizable value has a direct impact on the bottom-line.

“We reduced order entry costs by about 40%.” Significant savings in a shop that turns about 500 jobs a month.


Learn how…….

   
Back
Top