DC2060 Image Quality Issues - Help Please!

GusG

Well-known member
Hi All,

We have a big image quality problem on my Docucolor 2060 that has just started and my local technician (am based in Uganda) is seemingly at a loss, so I am looking for anything that can help us and him to sort out this issue.

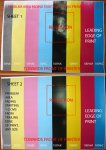
I've attached an image to show what's happening. Basically we are getting a fade that starts 4-5 cms from the edge of an A3 (11x17") or an A4 sent LEF on the edge that goes towards the back of the printer so that if we print A4 SEF the image is fine because it doesn't reach the problem area. It is not happening in the fuser because if I force a jam I can see the sheets on the transport belt before the fuser have the problem already. It also does not happen on all sheets, for instance the bottom sheet in the attached image is art gloss 250gsm and here this problem does not occur (there is another less serious problem I will describe later). All other types of paper I have tried in the machine has the above mentioned problem, the sheet on the top of the attached image is art gloss 90gsm but it also happens with art matt (our most used type of paper) and bond. The problem generally seems to be more pronounced with art matt paper/board.

The paper on the bottom of the attached image is art gloss 250 gsm board and it has a smaller fade on the trailing edge. We have had this problem all the time but it has almost only been on art matt and we have overcome it by printing on bigger sheets such as SRA3 and making a big enough bleed to go beyond the fade. Now it's also appearing on gloss and is apparently getting bigger.

Especially the first problem is seriously hampering us because it means that we can basically only do A4s.

If any of you are familiar with this I would be extremely grateful for any hints/tips/solutions that will help us to overcome this.:)

P.S. I've cross posted this on Copytechnet.
 

Attachments

  • DC2060 IQ Problem.jpg
    DC2060 IQ Problem.jpg
    219.3 KB · Views: 171
Image 2 - I've seen this happen on sheets that have a lot of curl, either that area being a bit curly before being printed on or are being auto-duplexed where curl occurs after the first side is imaged. It was caused by the back of the sheet not making good contact with 2060's image transfer belt which causes the toner to not lay down on it correctly, which in turn causes a lack of image in that area of the sheet. For me it was more pronounced on cover weight papers because of their extra stiffness when curled. Text weight papers rarely had the same issue. I'm no technician so I don't know all the correct lingo, but that's what caused it here. You can check it by using a cheater and forcing the machine to stop when the sheet is under the image transfer belt. By looking at the belt you can check to make sure all of the toner is being laid onto the sheet, and what is being left on the belt. Your technician should be able to do this. Does grain direction change the issue?

I also found that I lost some image due to the area in the cutter clamp when cutting sheets from parents. Some papers looked like Image 1 in this case, but it was sort of hit and miss. Again, it could be curl related, so changing the grain direction might generate different results. I'm not sure.

Unfortunately in either case I don't know of a solution, but hopefully this info will help in some way.

Good luck.
 
Thanks Doubting Thomas. After advice my technician had a look at the 2nd BTR roller assy yesterday, he cleaned contacts etc. and the image quality is almost there, the fading has gone on the edges and remaining are just some small spots of white, not very apparent on my photo but there is one you can see on the top image above where it says "50%M", another on the bottom image above where it say "100%C" almost on the right edge.
 
If the spots persist into a run it can mean that there is an issue with your developer housing. It could also be caused by paper dust, but those should look more like an offset hickie and vanish over a few clicks. Developer housing issues will be hit and miss across he sheet, but will not vanish predictably. At least these have been my experiences.
 
it looks to me like humidity on the paper. the toner is not adhering in that area because its humid.

try another kind of paper and see if it happens again. if not, change your paper.
 
Thanks guys for your help and suggestions so far, I'll get back to the white spots because in the meantime a much more serious problems has occurred. When backing anything, whether duplexing automatically or doing it manually I get a ghost image on the back of the sheet, i.e. the previously printed image which is on the bottom of the sheet as it passes through the printer. The image seems to be a faded repeat of the bottom of the previous sheet.

Any and all help appreciated, I've got irate clients breathing down my neck as I write this.
 
On Saturday I realised that the ghost imaging was only on the particular stock I was using for that job which was art paper gloss 115 gsm. Bond 80, art paper gloss and matt 135, art board 250 etc all went through the machine fine. And after printing a job on any of the other stocks I could put a couple hundred sheets of the art gloss 115 through before the problem reoccurred so that's how I finished that job.
I guess it was just bad quality paper.
 
Hi, How is your problem so far?
Did you ask the support from local xerox rep.?

I have some ideas and hope it helps:
- For the fade problem: As you mention, the problem is not fuser. so, I recommend you to make a hard stop to see if image problem presents on Transfer belt?
+YES: Make RAP ( Repair analysis procedure ) for Trasfer Belt, 1st BTR, Drum, Dev Housing,Ros.
+NO: 2ND BTR is the main reason : Try to clean the HVPS Contact and Roller itself.
-For ghosting image problem: Usually, This problem is due to Fuser when long run.Need to do the maintenance for fuser assy ( Donor roll, Wick, cleaner roll,....)
Regards

Hi Patin,

Thanks for the tips. Unfortunately our local Xerox rep fired the only guy who had a bit of training on this class of machine, so although I have a service and maintenance contract with them it is useless at the moment. I'm instead using the fired guy.
He cleaned the 2nd BTR contacts etc and that did eliminate the fading problem, as for the ghosting I'm living with that at the moment as it seems to be only happening on one type of stock.
 
Hi, the problem your having is indeed down to paper types, or should I say your Xerox.....I have been there my friend and basically it comes down to transfer voltages. Different stock weights and finishes need a range of different transfer voltages and the trailing edge is the first to show it. An easy way of getting around the problem is telling the machine its coated instead of uncoated. When we changed our machine to a DC5000 guess what? now they have added a control panel for you to mess about yourself with the voltages so you can get around the problem!
 
When we changed our machine to a DC5000 guess what? now they have added a control panel for you to mess about yourself with the voltages so you can get around the problem!
Very interesting, actually cleaning some contacts around the second BTR roller helped tremendously in our case.
Did you get image skew as in a curved output? I'm just seeing that when printing on A3 or SRA3 the straight edges of artwork on the long side is curved outward on one side and inward on the other by an equal amount of 2-3mm.
 
The curving could be cause by a couple of things, second btr pressure across the sheet especially if its worn unevenly or a support roller inside the ibt assembly. Yes we had that wonderful problem once too!
 

PressWise

A 30-day Fix for Managed Chaos

As any print professional knows, printing can be managed chaos. Software that solves multiple problems and provides measurable and monetizable value has a direct impact on the bottom-line.

“We reduced order entry costs by about 40%.” Significant savings in a shop that turns about 500 jobs a month.


Learn how…….

   
Back
Top