Plate Grain Direction

What is the importance/significance of the plate grain direction. I've always thought the grain should run across the cylinder. Our Kodak plates are running around the cylinder. We have a print problem that evidences itself in the top half of the tone scale that look suspiciously like the grain on the plate. Trying to eliminate causes.

Clark
 
Grain direction is primarily used to make sure the plates do not crack when locked into the lockups on your press..and in all cases grain direction is in relation to the grain of the actual aluminum of the plate, not the EC grain of the coating.

Typically grain direction falls in the direction around the cylinder..this could be grain short or long depending on the sizing of your plates..

you never at least in my opinion want the grain running the same direction as your lockups.. or across the cylinder.
 
Although I agree with some of what KMGI Sales writes I have to respectfully disagree with the last statement as the importance of aluminum grain direction is highly dependent on what type of press you are running (Sheetfed or Web). In the case of sheetfed the aluminum grain direction, either long or short, will have no significant impact on the plate’s performance. In the case of web it is recommended that the aluminum grain direction run perpendicular to the bend of the plate (around the cylinder). Due to the sharp bend angle required for web lockups, the perpendicular orientation of grain direction (usually grain short) will allow for additional strength and reduce crack outs during the press run.

Clark, A couple things that you can try to rule out plate vs. imaging are: One rotate the image on the plate and see if the problem rotates with it, if so it would lead to an imaging issue, second, if possible, rotate the plate during imaging and processing, and third change to a new lot number of plates and see if the issue remains.

Obviously we would love to help you further, though we would need a lot more detail on the situation. Please feel free to contact me directly or the Kodak Plate Service Center at 888-996-5877.

Todd Bigger
Global Marketing Manager – No Preheat Plates
[email protected]
 
I understand the crimping/cracking issue with web. And I understand that the metal has a grain direction. But isn't there additional graining or treatment done to the surface that allows the plate to carry water? It would seem to me that it would be better to have surface graining run across the cylinder, not around.
We have some Fiji plates here that were left over from a test we ran a while back and the grain runs across the cylinder on these plate. Seems like the pressmen said they ran less water on the Fijis.

Another question related somewhat: What temperature should the fountain solution be? Seems I read a post here by jbeniston from ManRoland about having the water at 10C in the tanks so that when it hits the pan it's about 12C. Our guys have it at 14C in the tanks, so it's probably 15-16C in the pan. Too warm? We're alcohol free running some flavour of Pricso in two ManRolands, a 629(300) and a 429(500). I'm the prepress guy hence the vagueness on the fountain solution.
 
What you are referring to is the EC coating graining, and this is abitrary, and is only affect on the plate line coating I believe by electricity, in regards to how uniform and how deep the graining is.

Is the plate your dealing with smooth? or is there a visible, or at least noticable grain on the plate?

The deeper the graining and the more uniform the better it tends to carry water.

When you run your plates, are you seeing a sheen to the plate on press when the water is dropped on the plate? or does it look dry?

Just trying to figure this one out for you, regardless of who's plate it is, we have in general as a print community help one another out.

Let us know

Thanks

Mark
 
The Rolands I worked with (305's) specifically stated in the manuals that the plates should be grain long. Running short grain plates led to some scratching issues with the auto-loading.
 
Clark, you are absolutely correct that a lithographic plate has two grain structures, aluminum grain and surface grain. Now as KMGI points out, the preparation of a plate’s surface grain structure can be created by using acid with electrical currents (EC Grain) or through a physical abrasion process (Mechanical Grain). In rare cases plate manufactures will use both which is called dual grain. In any case not all grain structures are created equal and most manufactures will alter the surface depending on the characteristics that are needed for that plate and what press application it will be used with.

To answer your question on surface grain direction, I will focus on EC grain, which is most commonly used today, and shows a non-directional characteristic. If you were to look at this structure under a high powered micro scope it would look like an English muffin when it is broken open. I think it was Thomas’s that coined the phrase “nooks and crannies”. It is in the creation of these “nooks and crannies”, which vary in frequency, diameter and depth, that a plate obtains its water carrying properties along with emulsion adhesion, processability, run length and a few other things. Now even though the grain structure is non-directional there is a post treat that is applied to the plate which prepares the surface for coating as well as allows the plate to roll up on press much faster. This post treat in very rare cases can interfere with the coating and cause streaking on the plate surface which may look like the aluminum grain, because it is apply in the same direction. It is because of this phenomenon that I suggested earlier to try a different lot number to rule out a manufacturing concern.

Sorry for the long winded response, but I hope it helps.
 
Plate Grain !!!

Plate Grain !!!

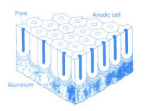
Hi everyone, the top layer of a Lithographic Plate is "Anodized" and looks like a " Bees Honeycomb "


See the Pic !! see Post # 2 better pic


Regards, Alois
 

Attachments

  • Anodized_Coating.gif
    Anodized_Coating.gif
    28.3 KB · Views: 378
Last edited:
Plate Grain # 2

Plate Grain # 2

A much better Pic !!!!!!!!!


Regards, Alois
 

Attachments

  • Anodized Layer # 1172.pdf
    159.3 KB · Views: 398
Here's a scanning electron microscope image of a plate. On the left the smooth dark areas are halftone dots. On the right, a blow up of the corner of a halftone dot.

PlateblownUp.jpg


best, gordo
 
Last edited:
Here's a scanning electron microscope image of a plate. On the left the smooth dark areas are halftone dots. On the right, a blow up of the corner of a halftone dot.

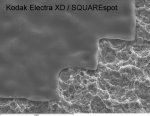
Gordo - you should have used the thermal SQUAREspot example instead... :) Those clean edges make a HUGE difference to consistency as your screening gets higher and the edge/area ratio gets bigger.

Kevin.
 

Attachments

  • XD-SS.jpg
    XD-SS.jpg
    109.1 KB · Views: 365
Gordo - you should have used the thermal SQUAREspot example instead... :) Those clean edges make a HUGE difference to consistency as your screening gets higher and the edge/area ratio gets bigger.

Well, after all, I was trying to illustrate the plate surface rather than the imaging technology. And, since I am not with Kodak, I chose to use a generic, less marketing related, image to do the job. :)

best, gordo

my print blog here: Quality In Print
 
Well I did not think it would come to this but it seems that the string wants to go quite deep into the anatomy of a plate’s grain structure, which is fine by me. I love to share this type of information. Gordo shows a great picture of the grained structure though I have attached a couple more images below which show the EC grain structure much closer as well as the anodic layer (Anodizing) that Alois refers to. Along with this I have outlined the 6 processes that a plate goes through in the creation of an EC grained substrate, for those who care to venture further.


The process of preparing an aluminum web for coating entails six different stages, including Metal Prep, Electro-chemical Graining, Etch, Desmut, Anodizing and Post Treatment.

Metal Prep – This process is intended to remove all dirt, oils and grime that might interfere with the graining process.

Electrochemical Graining - As mentioned in my earlier post, the formation of an EC Grain structure is created by the combination of sulfuric acid and electricity working in concert with the conductive properties of the aluminum to produce a surface that is pitted with random cells which vary in diameter, depth, and frequency due to the non-uniform nature of the alloys composition. This structure can be controlled though the dwell time in the acid, temperature, acid concentration, and/or the amount of electrical current applied. By altering these variables, a manufacturer will create differing grain structures which will create the needed characteristics for press latitude, water carrying uniformity, and adhesion.

Etch – The Etch process, which is an alkaline bath, is utilized to neutralize the graining acid while removing embedded abrasive particles of aluminum and smoothing any sharp peaks that were created during the graining process. One negative that comes from this process however is the creation of a black smut which is caused by the reaction of the etch chemical with the non-aluminum metals, such as copper, that are found in litho grade aluminum alloys.

Desmut – This process is just as the name denotes, the removal of the black smut that is formed during etching. This step will have no affect on the actual grain structure, though is crucial for surface preparation prior to anodizing.

Anodizing – The anodizing process is one of the most crucial stages in the creation of a litho plate as it provides the plate with many of its characteristics for run length, scratch resistance, and chemical resistance. Due to the fact that aluminum is a very soft and malleable metal, if we were to send the plate to press the pressures and abrasive nature of lithographic printing would destroy the grain almost instantly. The process of Anodizing creates a hard layer of aluminum oxide (second hardest substance known to man next to a diamond) on top of the grain structure which retains the previously created structure. This newly formed anodic layer will tend to vary in thickness based on plate type, the desired characteristics, and manufacture and can be a crucial characteristic in choosing the right plate for a given application. Although this layer is extremely hard it does not mean that it will not break down, in fact many plates that fail for run length are due to the wearing of the anodic layer and not the emulsion. Many long run plates purposely carry a thicker anodic layer (high oxide) to ensure that the non image area will not break down causing late run tinting, toning and picture framing as well as unpredictable changes to ink/water balance through the run. If any of you have ever taken a plate off the press and it is nice and shiny then you have depleted the anodic layer.

Post Treat - The last stage of the substrate preparation is the Post Treatment of the grained surface. Now, not all manufactures will do this process, but what it is intended to do is to promote better adhesion of the plate emulsion while also pre-treating the surface to improve water loving (hydrophilic) characteristics during the initial press start. This treatment will help a pressman achieve a faster make ready and color establishment as the ink and water balance is achieved much quicker. This layer will actually be abraded away very quickly (first few thousand impressions) when it is then replaced by the wetting agents found in the fountain solution. If you have ever seen a plate run great for the first few thousand impressions and then begin to catch up, this is a clear sign that the fountain solution is not providing ample non image area protection and it should be remixed or replaced.

We are now ready to apply a coating.

This concludes anatomy of a grain structure 101. Quiz on Friday.
 

Attachments

  • Grain Strcture Image.jpg
    Grain Strcture Image.jpg
    23.9 KB · Views: 539

PressWise

A 30-day Fix for Managed Chaos

As any print professional knows, printing can be managed chaos. Software that solves multiple problems and provides measurable and monetizable value has a direct impact on the bottom-line.

“We reduced order entry costs by about 40%.” Significant savings in a shop that turns about 500 jobs a month.


Learn how…….

   
Back
Top