Warping/Distortion in Illustrator or InDesign?

lynnic

Well-known member
Hi All,
I'm looking for a way to do a conical distortion of sorts in either Illustrator or InDesign. I know there are very expensive software packages out there to do this, but would like to know if it's possible to do this with the software I already have. Basically I would need to take a flat art file and convert to an arch so that the finished piece will be distorted as larger (wider) at the top than at the bottom. The finished piece is an ice cream tub, wider at the top and narrower at the bottom. Hopefully this makes sense.
Any help or suggestions are appreciated!
Thanks!
Lynn
 
Under the Effect pulldown, there's a Warp effect that allows you to use an arc. This may be a start. I know we figured out how to do this with a bit more precision at one point, but can't recall now.
 
Another tidbit: if you have any linked images in Illustrator, I believe they have to be embedded before the Warp effect works on them.
 
The distort command is also what I would recommend. I'm not sure what type of distortion you are going for, but there is more than one way to skin a cat.

Also are you using the latest version of Illustrator? I know they added a few features in the latest version that may make the process easier. I will have to play around with it as well as I've never used that tool in Illustrator, just Photoshop.

Good luck!
 
Iamgemini
Thanks for your response. I've played with it in Illustrator 5 but not getting quite the look I'm going for. I have not upgraded yet - have 5.5 but had issues and did an uninstall.
I need to take the whole file and distort on an arc shape so the graphics are wider at the top to adapt to the shape. I know it's hard to imagine but I will keep trying in my spare time. If you have any more tips let me know.
Thanks!
Lynn
 
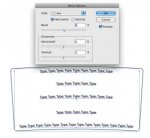
Create a dieline of the label you want to warp and stroke it. Using the Effect>Warp>Arc select Style: Arc and Horizontal. See attached screen shot. Adding other elements such as the type I added is helpful to insure the final look of the label is what you want.

Print out your first SWAG, cut on the dieline and wrap around the final object. Adjust as needed. Note that a very small percentage will usually suffice. When you hit the correct percentage and wrap the label around your object, the sides of the dieline will look like they are perpendicular to the bottom of the object to which you are applying the label. IMPORTANT: you need to know where the label will be on the object when your customer applies it. The amount of curve is based on where the label will live on the object, so if the customer cannot guarantee a "home" position on the object, your distortion will be less accurate.

Since this is a live effect, you will need to select Object>Expand Appearance when you have your art finalized. Note that doing this will turn type to outlines, so save an unexpanded copy of the art for future use.

Hope this helps
 

Attachments

  • Warp_Object.jpg
    Warp_Object.jpg
    11.4 KB · Views: 241
bill,
Thanks so much, this may just work. I'm printing a proof to see how it wraps around the sample that I have. Looks good though!! You just saved us a boat load of money!!
I love this site! Happy Days :)
Lynn
 
Billw,
a horizontal warp spreads it out too far outside my original die. I realize from everything I've found is that the job is possible but cumbersome in Illustrator. I may have to take sections of the art and warp individually to get it as close to the original art placement as possible. Any other thoughts? Still experimenting.
thanks so much!
Lynn
 

PressWise

A 30-day Fix for Managed Chaos

As any print professional knows, printing can be managed chaos. Software that solves multiple problems and provides measurable and monetizable value has a direct impact on the bottom-line.

“We reduced order entry costs by about 40%.” Significant savings in a shop that turns about 500 jobs a month.


Learn how…….

   
Back
Top