I feel like there is likely a really simple solution here and my brain is just fried...so don't judge.
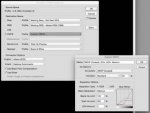
I have a client who consistently sends in art that is VERY heavy in black. The best black on my (wide format) printer is 40,30,30,100 so I have asked them to ensure that they are sending me art with those values in their blacks. The problem is that they are often using black raster images in their backgrounds. (Like for example, a starless night sky). So while they change all of their vector text to 40,30,30,100, the raster images remain whatever they are and come out as a greeny-black every time.
My question is, is there any way to change the black values of a raster image? If so, is it something I can do using PitStop or something or does it have to go back to the client?