New and need help

Hello there, my name is sister margaret and I prepare the plates for our press here at the monastery. I am currently working with Prinergy Evo: 5.3.6.1 and Preps 5.3. We had a big mishap two months or so ago on the client computer that I work on. The whole hard drive was gone, yes, everything on our G4 Mac was gone with the hard drive. I had some assistance from the man that updated us last year so I was able to just reinstall my programs from the PC. No, I didn't have a backup :(. However, my settings are not showing up for our Komori 20x26 press and after running a test plate most everything is okay. My plate color, job name, date and I can't remember what else is very small and backward along the bottom of the plate. We did have to adjust the front edge measurement on the plate as well but other than that we seem to be okay. If anyone can help me out with how to fix this problem it would be great. The gentleman that we purchased the update from lives many miles away and it could cost us lost of money to have him come and visit. I have dealt with him on the phone but he has a very strong accent and it is difficult to understand him sometimes. But nevertheless he is always very gracious and knowledgeable.
 
Is it possible for him to connect to your Evo system remotely? Not having to travel would greatly reduce his fee, I would think.

P.S. - I hope you get a backup plan in place!
 
Last edited:
Dear Sister Margaret. We offer remote support for Kodak CtP equipment. We can help with Prinergy.
Please use my contact information below, if you still need help.
​
Peter Warzecha
Viprofix Prepress Solutions
Phone: +1-773-545-7700 ext. 217
Email: [email protected]
Website: www.viprofix.com
 
Q. #1 My plate color, job name, and date info on the bottom of our plate prints out very small and backward along the bottom of the plate. It never did this before. The template layout shows up correctly in the preview signature in Preps. Is there a default setting that I have to change and if so where do I find it.
Q. #2 In my Preps Setup for Device my Komori 20x26 didn't show so I configured it from the option "Press sheet size". Any other hints to add to Device setup?
Any help would be appreciated. Thank you.
 
#1.
(Full disclosure - I'm running the full version of Prinergy, not Evo, and since I've never run Evo I can't promise that what I'm saying here applies to your setup, but maybe it will at least point you in the right direction.)

The info along the bottom of your plate (called a "slug") is usually controlled either by the RIP itself (Evo) or sometimes if there is a TIFF-catcher that controls the platesetter you might find it there. If it's the latter, you'll just have to dig around in the settings until you find it.

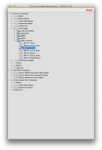
In my setup, it is added by Prinergy in the Process Template. To modify it, I go to Tools>Process Template Editor from within Prinergy Workshop. From that window, I find the Final Output section and click the triangle to expand, then find my device and finally the process template I wish to edit. Double-click the process template to bring up the window with its settings.

Screen Shot 2016-05-16 at 12.48.32 PM.png.jpg

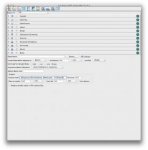
In this window, the last setting is called Marks. Open this one and there you will see the settings for Slugline. You can edit these to suit. I'm not sure how you get it to not print backward. Is it really backward, or perhaps mirrored?

Screen Shot 2016-05-16 at 12.41.56 PM.png.jpg

#2.
I'm afraid I can't offer much assistance with Preps 5 - I've got a newer version and I use it differently that you do. Do you only have one plate size to worry about? If so, and it works as you have it now, might be best to just lave it alone. Years ago I worked at a shop where Preps was set up such that we always had to make sure we were set up for the correct device before printing, but as soon as we switched to using Press Sheet Size it simplified matters greatly, as we no longer had to worry about setting the correct device first.
 
#1.
(Full disclosure - I'm running the full version of Prinergy, not Evo, and since I've never run Evo I can't promise that what I'm saying here applies to your setup, but maybe it will at least point you in the right direction.)

The info along the bottom of your plate (called a "slug") is usually controlled either by the RIP itself (Evo) or sometimes if there is a TIFF-catcher that controls the platesetter you might find it there. If it's the latter, you'll just have to dig around in the settings until you find it.

In my setup, it is added by Prinergy in the Process Template. To modify it, I go to Tools>Process Template Editor from within Prinergy Workshop. From that window, I find the Final Output section and click the triangle to expand, then find my device and finally the process template I wish to edit. Double-click the process template to bring up the window with its settings.


In this window, the last setting is called Marks. Open this one and there you will see the settings for Slugline. You can edit these to suit. I'm not sure how you get it to not print backward. Is it really backward, or perhaps mirrored?


#2.
I'm afraid I can't offer much assistance with Preps 5 - I've got a newer version and I use it differently that you do. Do you only have one plate size to worry about? If so, and it works as you have it now, might be best to just lave it alone. Years ago I worked at a shop where Preps was set up such that we always had to make sure we were set up for the correct device before printing, but as soon as we switched to using Press Sheet Size it simplified matters greatly, as we no longer had to worry about setting the correct device first.
 
Thank you, DCurry, your explanation sound like I can possibly do this on my own now. I will dig around and see what I come up with. Again, thank you so much!
 

PressWise

A 30-day Fix for Managed Chaos

As any print professional knows, printing can be managed chaos. Software that solves multiple problems and provides measurable and monetizable value has a direct impact on the bottom-line.

“We reduced order entry costs by about 40%.” Significant savings in a shop that turns about 500 jobs a month.


Learn how…….

   
Back
Top