Ricoh C7100 Banding Pattern ca. 17,5mm (ca. 0.7in) ???

Hi Guys,

we have a used C7100x, - I have a banding pattern in Black, which I initialy believed, is could be developer related - 50mm, 25mm pattern. - but I am not sure anymore, ... I attach a foto.

IMG_20230704_225158573.jpg
IMG_20230704_233229725.jpg


A single pattern is ca. 17,5-18mm (ca. 0.7in) wide,
- two ca 35mm (1.38in),
- three ca. 53mm (2.09in),
- four ca. 89mm (3.50in), -
- five 106mm (4.17in) etc.

- I did not find any similar pattern listed in the service documentation (there is only the 62mm/2.4in and 189mm/7.5in pattern - and the already mentioned 50mm, 25mm - or 52mm, 25mm).

Other colors are all good.

I have access to the whole documentation, and already tried the steps mentioned for this issue (initialisation, toner refresh, DEMS - multiple times already), - to no avail. Charge Unit has also been exchanged, - I did not exchange the Cleaning Unit, but I doubt that could be the problem (?).

The machine has a pretty high milage - over 6 Million Pages (3 Mio in color plus 3 Mio BW). - has been used under Ricoh contract until under ca. 5 Mio., but after this - the previous owner just serviced what had to be done, - and probably did not try every possible option. -

Do you have any Idea / possible solution?

Thank you for any help!
 
I have seen a similar issue on another machine, not a Ricoh. The developer housing had to be changed because it was worn on the gear side allowing movement of the roller. There was something defective in one of the gears that caused the wear over time and eventually created the lines. Is it just the photo, or are the lines stronger on one side of the sheet? If they are, check if that is the gear side. If so, look for any movement in the rollers. Bad bearing surfaces can produce very consistent lines that have no relation to the roller diameter.
 
I have seen a similar issue on another machine, not a Ricoh. The developer housing had to be changed because it was worn on the gear side allowing movement of the roller. There was something defective in one of the gears that caused the wear over time and eventually created the lines. Is it just the photo, or are the lines stronger on one side of the sheet? If they are, check if that is the gear side. If so, look for any movement in the rollers. Bad bearing surfaces can produce very consistent lines that have no relation to the roller diameter.
Hi Greg! Thank you for your reply! I think you are 100% right on this -
and yes, the lines are stronger to the front of the machine as to the back,

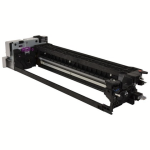
- the issue with the C7100 is, that you have to replace the whole thing - it is called photoconductor unit - and includes the developer group (I attached a picture). There is no information on servicing anything on this part (beside replacing one filter). The PCU does not even have a replacement interval, like other parts does, so I assume, Ricoh assumed, that it does not need to be changed frequently.

Or you think there is a way to service this and just replace the gears? We will certainly buy a new unit, but would then maybe try to work on the old one for the case, we need to change it once more later.
 

Attachments

  • 1688648412531.png
    1688648412531.png
    95.5 KB · Views: 143
Last edited:
Hmm. Generally it is the back (gear side) that is stronger. However, it's still possible that there is a mechanical issue with the front, or it's just tricking us. Not knowing the specifics of that particular machine, it's difficult to advise precisely. I would remove and check carefully front and back for any wear/slop at bearings, or retainers that may be loose. If you can get into service mode to see how many impressions are on that unit, it would be helpful. It may simply be time to replace. 6 million seems to be a magic number for Ricohs. That's when some "lifetime" parts start to fail. Still, it's worth replacing a few parts if you got a good deal on the machine. As far as keeping the old one, you can check the price of parts and figure in your labor value for rebuilding. How ever long you think it will take, double it. :) Then decide if it's worth it. Also consider that you could rebuild and have the same issue if the problem is with the base unit itself.
 
Those lines look exactly the width of the charge roller, nothing else is that small, drum would be much wider.
 
Those lines look exactly the width of the charge roller, nothing else is that small, drum would be much wider.
Hi, we already changed the charge roller. No change. Today I also changed the cleaning unit, - thought this could be some kind of vibration there, but also no change. So what is left, is developer unit.
 
Hmm. Generally it is the back (gear side) that is stronger. However, it's still possible that there is a mechanical issue with the front, or it's just tricking us. Not knowing the specifics of that particular machine, it's difficult to advise precisely. I would remove and check carefully front and back for any wear/slop at bearings, or retainers that may be loose. If you can get into service mode to see how many impressions are on that unit, it would be helpful. It may simply be time to replace. 6 million seems to be a magic number for Ricohs. That's when some "lifetime" parts start to fail. Still, it's worth replacing a few parts if you got a good deal on the machine. As far as keeping the old one, you can check the price of parts and figure in your labor value for rebuilding. How ever long you think it will take, double it. :) Then decide if it's worth it. Also consider that you could rebuild and have the same issue if the problem is with the base unit itself.
I looked today at the used magenta photoconductor unit that we got with the machine, which obviously has been changed as the machine still had the contract (we even got TWO used magenta PCUs - was obviously a more severe issue there).

It has a pattern that looks similar to our issue with black. So I assume, that after some million impressions something deforms inside of the unit. I can basically see that the shaft of the developer goes off center after every full movement - and I can feel that I need more force to move it at two points within one full move, - I assume this is what Ricoh relates to as they mention the "50mm, 25mm banding". So probably no way to easily repair that, if the recommended solution does not work (process init, toner refresh, DEMS) - we tried multiple times and it did not get any better.

IMG_20230706_193009596.jpg
IMG_20230706_193206696.jpg
 
Last edited:
That's why I say that bearing issues can produce lines that don't match a roller diameter. It's the bind-release action that causes the lines. It is usually divisible from the roller diameter - half, third, quarter, etc.
 
I would guess developer unit or I suppose it could be the drive for the development unit. If it's only one color it can't be itb, ptb, fuser and you tried charge and cleaning already.
 
I would guess developer unit or I suppose it could be the drive for the development unit. If it's only one color it can't be itb, ptb, fuser and you tried charge and cleaning already.
I wonder if there is any way to diagnose if this could be the drive? I could maybe switch the drives between black and 5th Station which we are not using often anyway (would need to check in parts catalog if they are the same). But as I have the broken magenta PCU showing obvious malfunction within the unit, it would rather be the PCU itself I assume.

if I may ask you something else - do you know why the PCU is different for black and color on the C7100? there is one sku for black and one which can be used for any CMY (probably S also). All PCUs use the same cleaning units, drums and charge units, and all need to be charged with developer upon installation (they all come developer powder-free, I believe), - but still they must differ somehow?
 
One more update: I further examined the magenta PCU, and now I can exactly see the problem (at least on this PCU, assume similar/same thing on the black one). I attach a video... The bearing on the left side (front) is loose to an extend of 1mm I would say. The right/rear one does not have this issue. This would also explain why I get stronger lines in front (bottom) than in the back (top side), should the black developer have the same issue.

I will try to dismantle the right (good) bearing and mount it into the black developer. But I am scared that I could make things worse - any hint of advice beside the obvious caution measures?

Btw: on the video you can also see that the roll movement is not smooth (it is smooth besides two points I mentioned earlier). Sorry for the bad quality, I had to keep the smartphone in the other hand. I already poured the most of the developer powder out of this unit, that is why it only gets so little of it sticking to the developer roll, - but still enough to reproduce the issue.
 
Last edited:
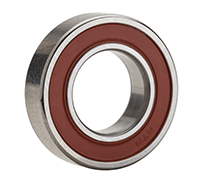
For the case someone else needs this information, the bearing on this particular magenta PCU developer roller is NTN 6800LU, as far as I can tell without the magnification glass.
 
I could need some assistance here - do you know a non destructive way to remove the bearing from the PCU housing? I don't mean the element securing the developer roller, which is obvious. I mean the bearing itself. There seem to be four metal latches every 90 degrees around the bearing - does it require a special tool (it is called "bearing puller", if I get it right) for sure to remove it or maybe there is some other method? I mean - this Magenta PCU is already broken, but I would like to try to remove the bearing without further opening the developer unit - if possible - so that I can change it this non invasive way on the black PCU later. The plan: broken bearing out, good in, ready ;)
IMG_20230707_190848998.jpg
 
Last edited:
I could need some assistance here - do you know a non destructive way to remove the bearing from the PCU housing? I don't mean the element securing the developer roller, which is obvious. I mean the bearing itself. There seem to be four metal latches every 90 grades - does it require a special tool (it is called "bearing puller", if I get it right) for sure to remove it or maybe there is some other method? I mean - this Magenta PCU is already broken, but I would like to try to remove the bearing without further opening the developer unit - if possible - so that I can change it this non invasive way on the black PCU later. The plan: broken bearing out, good in, ready ;)View attachment 292106
It is obviously more complicated than I initially thought. The bearing itself is housed in a plastic bracket of some kind, which is different for both sides, - I assume, that these have to be removed first, before the bearing itself can be removed (? Please, prove me wrong!), and for this, the developer needs to be opened (there is no locking mechanism or a screw visible from the outside, as far as I can tell). Opening the unit will mean removing the protective film and end seals (which are glued to the PCU and certainly not available as a spare part)... So any way, we need to get a new black PCU first, and then I can experiment a little bit with the old one.

I would still appreciate your feedback if you have any experience with refurbishing this kind of parts.
 

PressWise

A 30-day Fix for Managed Chaos

As any print professional knows, printing can be managed chaos. Software that solves multiple problems and provides measurable and monetizable value has a direct impact on the bottom-line.

“We reduced order entry costs by about 40%.” Significant savings in a shop that turns about 500 jobs a month.


Learn how…….

   
Back
Top