Grayscale PDF not printing Grayscale

jpfulton248

Well-known member
Workflow is this: Grayscale PSD file placed in an InDesign file exported to PDF in CMYK. We are printing the PDF via Fiery on a Xerox J75 and the large gray solid looks brown. Under a loupe we can verify that it is indeed CMYK, not just K. It is a 2-sided job and it is printed 4/1. The black side looks exactly as it should. Grays are gray.

The PSD file is real grayscale (Image > Mode > Grayscale).

I've tried a whole bunch of stuff and can't figure it out.
 
Have you checked the exported PDF in Acrobat, using Output Preview, to established that the image only appears on the black channel? If that looks OK, what is the CMYK source profile for the job in the Fiery?
 
When exporting to PDF from InDesign, what are the color settings? Are you embedding a profile? If so, what are your color settings. It's possible that your'e doing a color conversion on output.

Greg
 
If you view separations in Indesign is it showing it being black not not a mix of CMYK?
Yep, yellow... at lease originally.

Now it is not showing a level for yellow but if I turn off Cyan and Magenta so only Yellow and Black are showing, then I toggle Yellow on and off there is a very very obvious change in the appearance of the art. It is darker with only black showing and gets lighter when I enable yellow.
 
Last edited:
Open the PDF in Acrobat, open the Output Preview window (depending on your Acrobat version, in the new versions it's under Tools -> Print Production. Move the cursor over the PSD element and verify its color composition.
If Acrobat shows you it's made of black only, you probably have a color-management issue in your Fiery RIP. Try to disable all color conversions in the job ticket and see if that helps.
If it's made of composite CMYK, then InDesign is converting the element's colors. Try disabling color conversion in the "Output" tab when you export the PDF.
 
Yep, yellow.

If the PSD file you are placing in Indesign shows yellow in a file that should be all black/grayscale then your problem is in the file and not exporting to PDF. I do not use photoshop a lot, but have never had an issue converting to grayscale and bringing in Indesign and keeping the 1 colour black.
 
Open the PDF in Acrobat, open the Output Preview window (depending on your Acrobat version, in the new versions it's under Tools -> Print Production. Move the cursor over the PSD element and verify its color composition.
If Acrobat shows you it's made of black only, you probably have a color-management issue in your Fiery RIP. Try to disable all color conversions in the job ticket and see if that helps.
If it's made of composite CMYK, then InDesign is converting the element's colors. Try disabling color conversion in the "Output" tab when you export the PDF.
Thank you. I'll try this stuff when I get a minute.
 
In Indesign check the preferences - "Appearance of Black" Set it to output all blacks accurately .
 
Any chance you can upload the PSD file for others to look at? I think the problem is in your PSD file if it is showing yellow in indesign.
 
When I select a profile in Fiery Workstation and then go into the profile editor where it shows the rendering intent drop down there are 4 options. Without changing that I went to the little black swatch on the left of the window and selected that with the eyedropper. Then I look in the upper right side where it shows you what the color "should look like" then what it looks like based on the profile and then what it looks like after you make your profile edits. Well the "should look like" looks black but the other two look brown. So I thought I found the problem. I switched the rendering intent to "Relative Colorimetic"and that changed the blacks to actually look black. So I save the profile, make sure I select Relative Colorimetic as the rendering intent, apply the profile in Command Workstation and try to print one off. NO DIFFERENCE.
 
Yep, yellow... at lease originally.

Now it is not showing a level for yellow but if I turn off Cyan and Magenta so only Yellow and Black are showing, then I toggle Yellow on and off there is a very very obvious change in the appearance of the art. It is darker with only black showing and gets lighter when I enable yellow.

And if you turn off black does anything show? Can you paste of screen shots?
 
Have you tried copying the grayscale image and pasting it into the black channel of a new CMYK image in Photoshop? It's not elegant but it should work.
 
I had a similar issue with 3 files a customer sent. All three on screen showed a black only grey scale but one of them would print as a 4 colour grey.
Pre press could not spot the issue, When I opened the file in Acrobat and the used pitstop to inspect it I found that the grey had a ICC profile, the other two did not.
Maybe worth checking ??.
 
Link to psd file included... This is the file that gets placed into an InDesign file and then exported to PDF
 
Have you tried copying the grayscale image and pasting it into the black channel of a new CMYK image in Photoshop? It's not elegant but it should work.
Haven't tried this... Messed around with it a little bit but was having trouble with pasting it into the black channel.
 
Haven't tried this... Messed around with it a little bit but was having trouble with pasting it into the black channel.

Try this
-Select All
-Cut
-Mode CMYK
-Select Channels tab, select black
-Paste

Another possible option is convert to RGB (make sure R=G=B) and tell your DFE to treat RGB Grey as Black, I beleive all Fiery DFEs can do this
 
It sounds like an InDesign export setting, or an ICC profile setting within a specific object. But just case it's fine here's my $0.10.

I'm assuming you've looked at the print ready PDF in acrobat and had a look at the Output Preview? Assuming everything is as it's supposed to be there, it could be a Fiery setting.

Drop the PDF into Command Workstation, open up the properties of the job once it's sitting in the [Held] queue, click on the [Colour] tab.

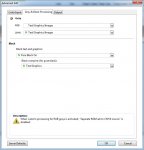
First, select [Expert Settings], then go to the [Gray & Black Processing] tab.

In the Gray section, there are two drop down boxes.

The RGB drop down box is normally set to "off" by default. This means when an image/object/text in your layout is RGB grey (ie, the R/G/B values are all the same), it gets printed as rich black.
The other two options allow the Fiery RIP to print "Text/Graphic"s or "Text/Graphics/Images" as true CMYK black (K only).
You'll only see a difference here if the object in question here is an RGB object, not CMYK object. You can easily identify that by looking at the object using the Pitstop Inspector tool.

The CMYK drop down box should be set to Text/Graphics/Images by default. This is what you would need for your purpose.
If it set to "Text/Graphics", then any text or graphics that are K only will print in black, and any raster images will print in rich black.
If it is set to "Off" then any CMYK text, graphic or image object that only uses the black separation will be printed as a rich black. Not what you want for your situation.

The next section down is the black section.
Basically it should have "Pure Black On" and the second drop down box should be set to "Text/Graphics".

Now that you're done in the [Expert Settings] section. try looking into the [Basic Settings] section.
Try setting the second drop down box in the CMYK/Grayscale section to "Pure Primaries". Basically when "Pure Primaries" is on a file that is imported to the RIP with C5 M0 Y0 K50, it will print that way. Sometimes Fiery's like to add a bit of extra toner to the output file to enhance the print quality based on the calibration or the printer it's tied to - it can be a very annoying feature when you have to do finicky colour matching.

It's a long shot that these settings will work, but what have you got to lose? :)
pure primaries.jpg
 

Attachments

  • Grey - advanced settings.jpg
    Grey - advanced settings.jpg
    87.6 KB · Views: 229
It's a long shot that these settings will work, but what have you got to lose? :)

6 cents per click is all :)

But seriously thank you for this long write up and for including screenshots. Some of my settings matched, some didn't but I've adjusted all now and I'm going to run a test. Just curious why you have ISO Coated as your source profile? The tech the came out and set us up told us to use Gracol (but he also admitted that he had no idea why and that we should do whatever we want).

Also, some of these settings make it look like we would be better off with our black intended files to be CYMK files that are only using K. Correct?
 

PressWise

A 30-day Fix for Managed Chaos

As any print professional knows, printing can be managed chaos. Software that solves multiple problems and provides measurable and monetizable value has a direct impact on the bottom-line.

“We reduced order entry costs by about 40%.” Significant savings in a shop that turns about 500 jobs a month.


Learn how…….

   
Back
Top