Konica C6500 - Calibration, weird curve on cyan

Emgee

Member
Hi All,

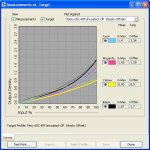
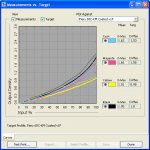
A few months ago I noticed that our cyan goes flat towards the end of the calibration curve. Our tech has looked at our machine, we've had charger, drum, and developer unit changed out... but the odd curve continues.

Any one here seen this sort of thing before or might know what the issue is?

I've also tried a different ES-1000 and same issue. Used my ES-1000 at another C6500 and no issue on the curve at that site.

I've attached a screenshot of the measurements curves.

Thanks!
 

Attachments

  • curves.jpg
    curves.jpg
    96.8 KB · Views: 299
You've shot down the arguement that the ES1000 is out of calibration (few people realize they need to be sent in yearly for re-certification. Looks like the paper type is husky offset. Is that one of the blue-white shades? I'd go with that or perhaps something in the electrostatic system. Like laser assembly or charge wire or bias transfer...

The common fault for that that I saw would be a developer. (BTW, I'd be more worried about the yellow curve than the cyan.)
 
@ShortRunMagazines:

Thanks for your feedback.

Yeah, I was calibrating to Husky Offset. But I see the same curve on cyan for all stocks I calibrate to (Cougar Digital Smooth, Productolith Digital Cover, and others).

The tech is actually here right now and I was showing him the yellow as it looks bad and I'm getting weirdness in prints that have a yellow component to them.

Developer Unit & developer is being replaced on Black as it is well past life.

I'll post results later on when service is complete.

Thanks!
 
Are you using the 34 patch random calibration sheet on the specific paper or just a sheet of bond?

Also ask your tech to show you how to do the Gama adjustment on your machine, if he hasnt already done it. This should help

The other option may be to restore the device to the default color cal (done in the calibrate window)
 
@Emtri:

Yep, I use the 34 patch randomized and I always configure the paper and calibrate to the stock I'm going to run.

I restore the device to default on each calibration as I read somewhere else (I think on these forums) that not doing so ends up applying a curve on top of a curve on top of... and so on.

I've done the gamma adjust as described in the tips book that Ubertech provided a few months ago.

Thanks!
 
Based on the screen shot of your measured vs target curves the the Cyan results are within an operational spec.

The purpose of calibration is to indicate to the Fiery what level of density it will achieve for a given ink % request. The basic requirements for the Fiery to apply a calibration is that the curves a reasonable smooth and that they end above the target max density levels. Ideally you would prefer to see measured curves that are a similar in shape to the target curves (this just means the colour corrections are easier and more consistent to correct for). The flatness in the yellow curve is probably going to cause you some problems. I would suggestion trying an alternative screening. Line 1 often improves many screening problems caused with yellow on C6500 range.

In the case of Cyan flattening out above 93%. The C6500 has been designed that Cyan at 100% on uncoated stocks needs an output density of 1.34 (D-Max) value. Every time you see the C6500 pause during a job for image stabilisation it is placing a series of max density patches on the transfer belt and checking that the developer system is providing sufficient toner. If it measures a lower value it will attempt to boost the max density to 1.34 likewise if the density is greater than 1.34 it will try to reduce the density.

The Fiery then knows that if you need to mix 100% Cyan it needs to request from the C6500 a toner density of 1.34 and to achieve this density it will ask the C6500 to print approx 93% ink.

In similar manner where Magenta is beneath the targets in the 70 -90 % area if the Fiery needs the engine to print 80% ink level it needs to request a density of approx .85 and this achieved by requesting an ink level 83%.

I would also recommend you use sorted patches on a Toner based machine rather than random. Random patches are in theory the preferred method for calibration (measuring colour across the imaging system). The way toner machines work there can be a drop off in density from front to rear of a machine based on how even(parallel) the charge wires are to the drum surface. With random patches it may be the case that two patches that are only a few percent apart but one is at the front of the sheet and one is at the rear, the patches will either be read the same density value or a greater difference than would occur i they where printed next to each. This then produces measured curves that not smooth. This may be partly effect your yellow curve.

I hope this is of some help in understanding the colour target curves.

Darrell John
National Production Analyst
Konica Minolta Australia
 
Hi Darrell,

Thank you for taking the time to reply and for the information on the C6500.

One thing I didn't mention in my initial post, is that this is not a new machine to us. We've had it for 4 years now (new-out-of-the-box) and it is only recently that I've started to get the flattening of the cyan curve abover the 90% or so mark.

The yellow concerns me as well. Our tech checked and the yellow developer unit is at about 75% of the rated life (our black was at 130%). So the black unit was replaced.

I tried the sorted patches as recommended and will use it for the next few jobs to see how it works. I've attached a curve measurements screenshot from the sorted patches.

We also had our Fiery downgraded to System 8 from System 9 to see if it had any effect. Nope, the curves shown in the screenshot are from System 8 Ver 2.

Thank you.
 

Attachments

  • curves-sortedpatches.jpg
    curves-sortedpatches.jpg
    95.9 KB · Views: 465
I would also like to point out that since the introduction of the C6501, some parts like the dev and drums were standardized. You will generally get more then 100% out of the life on drums and dev.. This of course as with anything varies on how hard you run your machine and so forth. When I was a tech with konica we had one client that we were replacing the dev on their 1050's every week just because of the type of job they were running

I would also like to ask if you purchased this machine from Konica or a reseller?
How many copies are on your machine?
When you bought the ES-1000 did you also purchase the colour profiling suit along with it?
If you did use this over the fiery colour cal and see how it turns out afterwords (it prints 7 pages of color patches that you scan in)
 
Hi Emtri,

I would also like to ask if you purchased this machine from Konica or a reseller?

Not Konica direct, but from a Konica authorized reseller/company.

How many copies are on your machine?

Just over 700,000 clicks right now. That's 4 years of clicks, we're low volume.

When you bought the ES-1000 did you also purchase the colour profiling suit along with it?

No we didn't. We're not colour critical; as long as it's close we're good. A large commercial printer we know has the same machine and they didn't even bother with the Suite.

As I said, the cyan curve started looking like that just a few months ago and hasn't changed since (even with PMs done on the machine; except for developer unit).

The yellow curve is still being looked at; the tech said he'll try the developer unit since charger and drum haven't made a difference (we're also getting weird banding on the yellow too, more noticeable on some prints than others).

Thanks for all the feedback and information, all good stuff.
 
We were lucky enough that the original owner of our shop purchased the profiler suit. It has alot of good uses, but yes your correct in that its not really necessary to get good colour, especially if your not too colour critical.

I would suspect dev/dev unit as well.
The reason I asked about konica itself, is they have a policy that if they cannot repair a machine then they will replace it with a current model. I however have no idea of this carries over through resellers.

Can you describe this weird banding in the yellow?
 
@Emtri:

Sure, I've attached an image to help illustrate what I'm seeing.

Where the yellow bars appear is where prints (which have a heavier yellow component) exhibit banding. It could be that either there is too much yellow being put down in those areas or not enough in the other. Either way, it is very noticable on prints (again, depending on the content).

We even had our Fiery rolled back to System 8 Ver 2 (from System 9 Ver 3) just to take the Fiery out of the loop. Which doesn't seem to be the problem (or part of).
 

Attachments

  • banding.jpg
    banding.jpg
    16.4 KB · Views: 259
To me this sounds like it would be a charge corona problem, however I do believe you've said you've had these and the drums replaced.
This again points to an issue with your dev unit
 
Hi to all who have been checking this thread...

The technician changed out the developer unit and developer today; still the same inverse yellow curve. He then swapped in a new laser and no difference. Same curve.

I got an ES-1000 from a commercial printer we know and tried measurements with their ES-1000, just to be certain it's not our ES-1000. Same inverse curve on yellow and that drop off on cyan. So I can rule out the ES-1000 again.
 
The technician changed out the developer unit and developer today; still the same inverse yellow curve. He then swapped in a new laser and no difference. Same curve.

Darn and that was going to be my next suggestion (I guess I'm still thinking like a konica tech)
You've done everything that I can think of and replaced alot of parts. Its possible your fiery is corrupted or something? I've got an external fiery but we've had the HD go on the fritz and cause issues (nothing like this but who knows Im running out of ideas here lol)

Rehaps redo auto gama adj/belt refresh/all 4 of auto cals in 8 of expert adj
also maybe the manual one as well (it scans some patterns of the glass)

Utility menu => [03 Machine admin. Setting] => [01 System setting] => [05 Expert
adjustment] => [07 Quality adjustment] => [01 Printer gamma offset adj.] or [02 Printer
gamma offset auto adj.]

You've replaced alot of parts. In canycase It cant hurt.
 
How about the 1st transfer rollers? Have replaced them?
Try playing with 1st transfer current:
[Utility/Counter] => [03 Machine Admin. Setting] => [01System Setting] => [05 Expert
Adjustment]=> [06 Process Adjustment] => [01 Front & Back Density]
 
5501

5501

I am getting a drop in my cyan curve as well, but much more drastic. How can I attatch my calibration profile so you can see what I am talking about.

Thanks, Tony
 

PressWise

A 30-day Fix for Managed Chaos

As any print professional knows, printing can be managed chaos. Software that solves multiple problems and provides measurable and monetizable value has a direct impact on the bottom-line.

“We reduced order entry costs by about 40%.” Significant savings in a shop that turns about 500 jobs a month.


Learn how…….

   
Back
Top