Matching offset fingerprinted CMYK proofs to digital HP30K press

First time post, looking for some good advice. This past year we completed multiple fingerprints for our offset litho presses. Our press profile and proofing profile are essentially synchronized. We also run the HP30000 Indigo press. Just recently we had a proof (made using a new profile) that just couldn’t match the digital print job. The printing off the HP was a bit lighter than the proof, even after applying a LUT exp_05 (which is supposed to simulate our DG from litho). The HP press operator had to push his magenta density away from the default which I’m told is not optimal (had to go higher than 1.45). Anyway, he was able achieve reasonable color, but it came with concern. I should note that the new fingerprint targeted GracoL 2013/G7. Since we fingerprinted the offset presses, is there any recommendation to dial in the HP30K to match these new fingerprint profiles?
 
You could do this in many ways, the best approach depends of your skillset and tools.
1. Measure the press and make your own LUTs in the HP PrintOS to mimic your wanted target DG.
2. Fingerprint the HP press at it's current state and create a DeviceLink Profile (from your wanted target to the press profile), the DeviceLink can be applied in the HP PrintOS.
3. Use the G7 approach and calibrate the press according to the G7 method (NPDC).
 
In this context, "fingerprint" refers to the process of printing a CMYK profile target (such as the ECI2002 or similar) to create an ICC profile specific to your press and paper combination. This is typically done using software like X-Rite Profiler (or comparable tools) alongside a spectrophotometer.

A DeviceLink profile, on the other hand, is a CMYK-to-CMYK conversion profile. It enables direct conversion from your chosen CMYK standard (input color space) to your measured press profile (fingerprint profile) without passing through the Lab color space. This approach is especially useful for color-converting entire PDF documents, as it allows you to preserve pure primary colors by applying specific rules when generating the DeviceLink profile.
 
Last edited:
thank you
In this context, "fingerprint" refers to the process of printing a CMYK profile target (such as the ECI2002 or similar) to create an ICC profile specific to your press and paper combination. This is typically done using software like X-Rite Profiler (or comparable tools) alongside a spectrophotometer.

A DeviceLink profile, on the other hand, is a CMYK-to-CMYK conversion profile. It enables direct conversion from your chosen CMYK standard (input color space) to your measured press profile (fingerprint profile) without passing through the Lab color space. This approach is especially useful for color-converting entire PDF documents, as it allows you to preserve pure primary colors by applying specific rules when generating the DeviceLink profile.

When i fingeprint then and use this target, i suppose is a colour scale to measure i print with a profile in the printer ? or i just print with no colour profile at full gamut?
If my profile is coated fogra 39 and i print to uncoated and need to reduce the total ink amount to 280, what is proper way to doit with the device link in the print os at the end ?
 
Great questions!

When printing a CMYK profiling target, it's ideal to avoid any color conversions. The input CMYK values should remain "untouched" in the output, except for any calibration or linearization curves. Achieving this depends on the RIP or workflow software you're using. In some systems, you can turn off color management entirely, or set CMYK to bypass it. In others, you might need to select the same CMYK profile for both input and output, which effectively results in no conversion. It varies depending on the software.

As for setting the ink coverage to 280% (TAC/TIC), you can specify this while creating the profile in your profiling software. This applies to both the printer profile (aka the fingerprint profile) and any DeviceLink profiles you create.

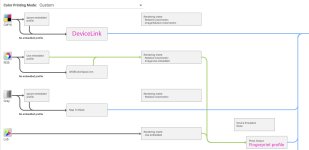
I've attached a screenshot how we setup the color management in HP PrintOS DFE.
 

Attachments

  • hp_dfe.jpg
    hp_dfe.jpg
    240.2 KB · Views: 38
Last edited:
Great questions!

When printing a CMYK profiling target, it's ideal to avoid any color conversions. The input CMYK values should remain "untouched" in the output, except for any calibration or linearization curves. Achieving this depends on the RIP or workflow software you're using. In some systems, you can turn off color management entirely, or set CMYK to bypass it. In others, you might need to select the same CMYK profile for both input and output, which effectively results in no conversion. It varies depending on the software.

As for setting the ink coverage to 280% (TAC/TIC), you can specify this while creating the profile in your profiling software. This applies to both the printer profile (aka the fingerprint profile) and any DeviceLink profiles you create.

I've attached a screenshot how we setup the color management in HP PrintOS DFE.
According to the screenshot the pdf file i send to print has to be in unique color space? CMYk only? or even its contains RGB photos the colour managment can convert them its colour space in the file or page individually?
 
The screenshot refers to the production environment after the profiles have been created. Input PDFs can contain both CMYK and RGB data, and both will be processed correctly. In our case, we always "normalize" RGB to FOGRA51 before sending it to the RIP, but the approach you take will depend on your specific workflow preferences.
 
The screenshot refers to the production environment after the profiles have been created. Input PDFs can contain both CMYK and RGB data, and both will be processed correctly. In our case, we always "normalize" RGB to FOGRA51 before sending it to the RIP, but the approach you take will depend on your specific workflow preferences.

How i can normalise a pdf? usually i doit in acrobat in convert colours, this normalisation also create datalock files that cant be altered after in the final rip? i mean about font problems.
 
Normalizing can mean many things, but in our case, we preflight and color manage our PDF files in Enfocus Switch before they reach the DFE. The main reason we convert RGB to CMYK prior to the RIP process is to maintain tighter control over the color conversion. We use our custom version of Fogra51 and apply a perceptual conversion with a slight whitepoint adjustment. Additionally, since we work with multiple RIPs across various presses, this ensures that CMYK handling is consistently set up correctly.

While we prefer to receive PDF/X-4 (RGB) files from our clients, that’s a topic for another discussion.
 
Thank you!
Normalizing can mean many things, but in our case, we preflight and color manage our PDF files in Enfocus Switch before they reach the DFE. The main reason we convert RGB to CMYK prior to the RIP process is to maintain tighter control over the color conversion. We use our custom version of Fogra51 and apply a perceptual conversion with a slight whitepoint adjustment. Additionally, since we work with multiple RIPs across various presses, this ensures that CMYK handling is consistently set up correctly.

While we prefer to receive PDF/X-4 (RGB) files from our clients, that’s a topic for another discussion.

So to conclude if i underastand well.
As we print to coated and uncoated papers i have to print different Profiling targets and measure to fingerprint the press ( these targets are Fogra 51 & 52?) I also apply my Web TAC rules.
Then i preflight - normalize the pdf file to CMYK with Fogra 51 ( even its intended for uncoated paper?) , without Tac rules and while printing converts at production through Devicelink profile (CMYK Fogra 51 to CMYK Fingerprint Coated or uncoated Profile). Is this correct?
 
When printing on both coated and uncoated papers, you don't need different profiling targets; the same target or color chart is used regardless of the paper type. However, you will create separate fingerprint profiles—one for coated and one for uncoated paper.

Fingerprint profiles simply describe how CMYK values print on a specific press and paper combination, with no direct connection to FOGRA51 or FOGRA52 at this stage.

You don’t necessarily need to target FOGRA52 for uncoated production unless you need to match offset printing.

Here’s a step-by-step outline of the process:

1. Print the color profile target/chart (e.g., ECI2002) on both coated and uncoated paper. Ensure there’s no color conversion in the RIP—only apply calibration curves.
2. Measure the color chart with a spectrophotometer and create the CMYK fingerprint profile. This is also where you can set the TAC (Total Area Coverage).
3. Create a DeviceLink profile where the input is FOGRA51 and the output is your newly created fingerprint profile. You can also adjust TAC and GCR (Gray Component Replacement) in this step.
4. Apply the DeviceLink profile in the DFE (RIP).
Hi, when we print heavy ink images like the one i attach even we apply tac 280 we get wringled paper, do you have any advice ?
1728978430443.png
 
First, you need to ensure that the image is actually being converted to 280% TAC in your workflow. Can you preview the separations of the rendered artwork in your DFE and measure the TAC? Or maybe you could post a screen shot of your DFE settings?

If the TAC is indeed too high for your paper/press/ink combination, you can always try to lower the TAC during the profile creation stage.
Hi Cant do it in the dfe yet and we have done it through Enfocus i send you some screenshots of the image, eventually the coming week i will setup Dfe settings is there a critical option have to be taking in account? Regards
1729054944423.png
1729054991954.png
1729055042896.png
 
First, you need to ensure that the image is actually being converted to 280% TAC in your workflow. Can you preview the separations of the rendered artwork in your DFE and measure the TAC? Or maybe you could post a screen shot of your DFE settings?

If the TAC is indeed too high for your paper/press/ink combination, you can always try to lower the TAC during the profile creation stage.
Do you set up to all prints jobs Tac 280? or only for uncoated paper
 
You said "when we print heavy ink images like the one i attach even we apply tac 280 we get wringled paper".

Are you 100% sure there is no 'CMYK to CMYK conversion' in the DFE?

If you are sure no conversion is applied in the DFE and you still have these issues you could consider to lower the TAC more and try if that solves your problem.
 

PressWise

A 30-day Fix for Managed Chaos

As any print professional knows, printing can be managed chaos. Software that solves multiple problems and provides measurable and monetizable value has a direct impact on the bottom-line.

“We reduced order entry costs by about 40%.” Significant savings in a shop that turns about 500 jobs a month.


Learn how…….

   
Back
Top