Experience with Konica Minolta PB 503 perfect binding unit?

hkellogg

Well-known member
Does anyone have experience with the PB 503 perfect binding unit available on the Konica Minolta AccurioPress and BizHub? It seems that it is a bit finicky when it comes to the size of a pre-printed covers and the main pages of the document. We were able to bind a document but we can't seem to duplicate the process. Anyone familiar with this unit?


Thanks

Hans
 
The cover tray of the PB-503 maxes out at 18.5" length. The PB-503 itself trims off the excess from the face edge of the rear cover. Given that, there's no reason not to just use 18.5" long stock all the time.
 
We have a PB-503 and use it daily. It's an awesome unit. We cut the covers to 11x18 and they work just fine. What exactly is the issue you're experiencing?
 
We have one and our service guy visits often. Recently had the glue tank break and it took 9 months for service idiots to figure out how to fix it. Luckily I had a spare PB binder and borrowed the glue tank from it.
 
The cover tray of the PB-503 maxes out at 18.5" length. The PB-503 itself trims off the excess from the face edge of the rear cover. Given that, there's no reason not to just use 18.5" long stock all the time.
Thanks for the response.

I know it was last year but we are facing another project and I want to make sure we are covering this correctly (no pun intended). So if we use 18"5 inch stock all the time, do we just reposition the image to make sure that it fits properly? What do you do about bleeds. Do you do a top and bottom trim after or do you try and work with the finished size stock from the beginning. Do you always print the covers before and then bind the covers when printing the guts?

Some of our problem is that we are getting student produced files and we are typically inexperienced operators. Makes for a double whammy.

Thanks
 
We have a PB-503 and use it daily. It's an awesome unit. We cut the covers to 11x18 and they work just fine. What exactly is the issue you're experiencing?
Like I stated for Steve0,

Thanks for the response.

I know it was last year but we are facing another project and I want to make sure we are covering this correctly (no pun intended). So if we use 18"5 inch stock all the time, do we just reposition the image to make sure that it fits properly? What do you do about bleeds. Do you do a top and bottom trim after or do you try and work with the finished size stock from the beginning. Do you always print the covers before and then bind the covers when printing the guts?

Some of our problem is that we are getting student produced files and we are typically inexperienced operators. Makes for a double whammy.

Thanks
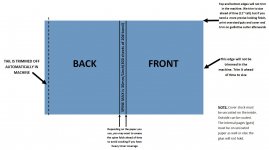
I made a diagram that may help you out. Let me know if you have further questions.
 

Attachments

  • Perfect Binder instructions.JPG
    Perfect Binder instructions.JPG
    104.1 KB · Views: 390
I made a diagram that may help you out. Let me know if you have further questions.
Thank you. That is a big help understanding what is happening in the PB process. The KN is vague at best.

Have you ever included a fold out/gate fold in a perfect bind project? Seems like the manual states that it is possible.
 
Thank you. That is a big help understanding what is happening in the PB process. The KN is vague at best.

Have you ever included a fold out/gate fold in a perfect bind project? Seems like the manual states that it is possible.
Yes, I have. You can only do it if you have the FD unit. I believe it’s limited to 4 or 5 fold outs. And it does a z-fold, not gate fold.
 
I made a diagram that may help you out. Let me know if you have further questions.
Yes, I have. You can only do it if you have the FD unit. I believe it’s limited to 4 or 5 fold outs. And it does a z-fold, not gate fold.
Do you folks have challenges with internal bleeds using the
I made a diagram that may help you out. Let me know if you have further questions.
Do bleeds internally in the perfect bound publication cause problems?
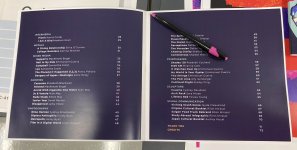
Seems like we are getting a white edge at the spine. Not sure if it is something that we need to correct within InDesign or the PDF file. We want a bleed on the outside edges too, but we realize that we can correct that by running an oversize sheet and cover and trimming it while the publication is off line.
 

Attachments

  • bleeding wtih the 503.jpg
    bleeding wtih the 503.jpg
    634.2 KB · Views: 304
Do you folks have challenges with internal bleeds using the

Do bleeds internally in the perfect bound publication cause problems?
Seems like we are getting a white edge at the spine. Not sure if it is something that we need to correct within InDesign or the PDF file. We want a bleed on the outside edges too, but we realize that we can correct that by running an oversize sheet and cover and trimming it while the publication is off line.
I assume that we would have a thin white space but not as big as it is in the picture.
 
Not sure if I understand your question @hkellogg ....can you please clarify? The printer is not able to print full bleed. You would have to print on an oversized sheet, then trim down to the bleeds.
 
I understand that we have to print on an oversize sheet for bleeds on the top, outside, and bottom of the book. What I am concerned with is the edge of the page that constitutes the spine. We are getting a white line in the crack of the spine. Is there anything that can be done? I understand that the KM digital press can't bleed off the page edge but how can we set up the job so the image is as close as possible to the edge. I have attached an image that shows the problem.

The job was obviously designed to have the image cross over the spine.
 

Attachments

  • Screen Shot 2021-03-16 at 6.57.17 PM.png
    Screen Shot 2021-03-16 at 6.57.17 PM.png
    2 MB · Views: 268
I understand that we have to print on an oversize sheet for bleeds on the top, outside, and bottom of the book. What I am concerned with is the edge of the page that constitutes the spine. We are getting a white line in the crack of the spine. Is there anything that can be done? I understand that the KM digital press can't bleed off the page edge but how can we set up the job so the image is as close as possible to the edge. I have attached an image that shows the problem.

The job was obviously designed to have the image cross over the spine.
This doesn't appear to be related to the perfect binder. I believe it's the way your file is setup. I noticed there are crop marks printing in the white area, so the printer can produce an image closer to the spine. The quickest way you can adjust this is using 'Image Shift' if you're using a Fiery, or 'Image Position' if you're using the KM controller. Even still, it won't print all the way to the edge, and you'll be left with a white gutter. What I do for jobs like this is run the guts on an oversized sheet, then cut down to the bleed, then run it back through the machine by printing a blank PDF. It's best if you have the FD-503 post inserter trays so you can avoid having the sheets go back through the engine.
 
This doesn't appear to be related to the perfect binder. I believe it's the way your file is setup. I noticed there are crop marks printing in the white area, so the printer can produce an image closer to the spine. The quickest way you can adjust this is using 'Image Shift' if you're using a Fiery, or 'Image Position' if you're using the KM controller. Even still, it won't print all the way to the edge, and you'll be left with a white gutter. What I do for jobs like this is run the guts on an oversized sheet, then cut down to the bleed, then run it back through the machine by printing a blank PDF. It's best if you have the FD-503 post inserter trays so you can avoid having the sheets go back through the engine.
Thanks. My student thought of that as well. We don't have the post inserter so we would have to run it back through the machine.
 
Thanks. My student thought of that as well. We don't have the post inserter so we would have to run it back through the machine.
I used to have the PB-503 up until last year and did not have the post inserter. I had no issues running pre-printed covers back through the press.
 
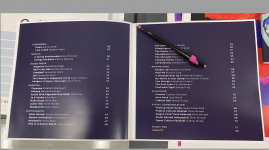
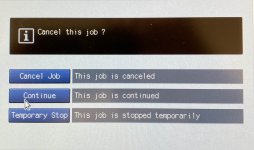
Here are two images of the problems we are having. The second is the jumbled pages that started to occur when we unloaded a batch of finished books. The first image is something the students say comes up every time they start the PB job. They have just been hitting continue and things seem to have worked.

Not sure about the second one. May put in a call to service? Seems strange this started to occur in the middle of a run. Oh, and I put a good book in the pict to show the difference.
 

Attachments

  • Cancel this job.jpg
    Cancel this job.jpg
    462.4 KB · Views: 273
  • Shuffled pages.jpg
    Shuffled pages.jpg
    194.4 KB · Views: 286
We ran our perfect binder with a Fiery and ran into the job cancellation screen if we had a setting inconsistency between the Fiery and the engine. All paper tray settings in the engine and the Fiery need to be identical, otherwise the press will halt the job when it runs into that inconsistency. If I recall - the PB-503 won't allow you to 'change setting' or 'force output' like you can normally if the settings don't match - it'll just stop. I do recall a couple occasions where we had a paper setting set incorrectly and the press didn't even give us the option to continue - we could only cancel the job and figure out what setting we had incorrect.

The shuffled pages thing is a bit more odd. I know in the PB-503 finisher settings in the engine there's an adjustment for that, but it doesn't make sense that it just starts jumbling pages in the middle of a run. Are you just reaching inside to pull books out or are you pressing the button to activate the conveyor that transports them to the cart? Do you have any curl correction turned on or off?
 
@crajos is correct about the error message. Something in your settings is not matching up...either the specified cover size in the print settings doesn't match what you told the engine, or the internal pages size isn't matching. As for the shuffling pages, this is most likely a problem with the PB that service needs to fix. We had this issue before and the jogging arms in the PB weren't closing properly.

Aside from that, one thing that could effect this is how the internal pages paper is loaded in the drawers. Make sure you're following the proper loading setup (this process will also help alleviate paper jamming that results from the paper drawers). The process is as follows for the vacuum feed drawers (drawers 3-5): open the desired drawer, push the small blue screw on the left side of the drawer towards the operator side, place 2-3 sheets in the drawer and close it. This will cause the drawer to lift to the top feeding position. Most likely you'll notice the side bars are squishing the paper too tight. With one hand, 'bend' each side guide/bar outward slightly, leaving only a small (<1/16") gap between the bars and paper, then screw in the top blue screws to hold in place to hold the adjustment. Move the blue screw on the left side of the drawer back towards the printer which will cause the paper deck to lower back down into loading position. Load the rest of the paper.
 

PressWise

A 30-day Fix for Managed Chaos

As any print professional knows, printing can be managed chaos. Software that solves multiple problems and provides measurable and monetizable value has a direct impact on the bottom-line.

“We reduced order entry costs by about 40%.” Significant savings in a shop that turns about 500 jobs a month.


Learn how…….

   
Back
Top