Xerox Versant 3100 artifacts

SoggyWinter

Well-known member
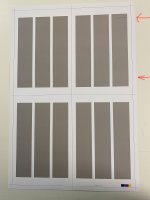
We’re seeing image artifacts on 13x19 270gsm paper, both coated and uncoated. They are on the inboard (opposite operator) side and perpendicular to the paper path. About 155mm apart. 120gsm coated and uncoated 13x19 paper does NOT have the artifacts.

Other troubleshooting attempted for image artifact troubleshooting

-cleaned toner and fuser

-calibrated full width array

-swapped 2nd BTR with new in the box spare

-swapped fuser belt with new in the box spare

-swapped lower pressure roller with new in the box spare

-swapped IBT cleaner with new in the box spare

-swapped drum positions

-developer housings and developer have plenty of life left

-IBT belt is almost new

-cooling belts are new

Running a few hundred 13x19 impressions cleared the issue up for ~2000 impressions, but it came back a few hours later after the press had been idle.

We can rub the paper against the inside of the registration module and the paint or coating comes off the metal and onto the paper, which makes me think this may be an issue with metal coating particles getting scraped off the registration module and causing extra toner to get fused, but I may be grasping at straws...
 

Attachments

  • 3100 artifacts 06.03.2024.jpg
    3100 artifacts 06.03.2024.jpg
    4.3 MB · Views: 55
Check the fuser belt speed sensor wheel.

Is that orange wheel on the inside of the fuser frame cover, 146K91030? I replaced it a couple of weeks ago after losing a fuser belt assembley to 099-339 fuser belt position error.

semi-related question
Is it possible repair a versant fuser belt assembly after it gets a fuser belt position error? I tried de-tensioning the belt and moving it back into a guess at the correct position, but it still threw the error.

On a similar note-
I had another fuser leak a 1/2" puddle of what I think is wick oil to the operators side. I pulled the fuser belt module out of an abundance of caution. Was that the correct course of action?
That could be a worn pressure roll , wick or sheet pad
 
Is it always the same position on the sheet? If it is then I would check in the alignment area.

If it repeats on the sheet, what distance does the mark repeat itself? Once you know that, then check the diameters of rollers drums etc.
 
Is that orange wheel on the inside of the fuser frame cover, 146K91030? I replaced it a couple of weeks ago after losing a fuser belt assembley to 099-339 fuser belt position error.

semi-related question
Is it possible repair a versant fuser belt assembly after it gets a fuser belt position error? I tried de-tensioning the belt and moving it back into a guess at the correct position, but it still threw the error.

On a similar note-
I had another fuser leak a 1/2" puddle of what I think is wick oil to the operators side. I pulled the fuser belt module out of an abundance of caution. Was that the correct course of action?
Yes, you can rebuild the fuser after the belt position error. If you’re replacing the heat belt you should also replace the slip sheet and wick at the same time and make sure to soak the wick in the heat belt oil. The wick shouldn't be dripping in oil and it shouldn't cause a puddle. I wouldn't trash the whole fuser assembly after seeing the oil. Keep it and take the belt and wick off and have a look.

It could be possible that the belt positioning sensor is not in the correct position, or the sensors are not working correctly. There’s a little arm (heat belt position sensor) that runs along the operator side of belt and if that’s not touching the belt, the belt could be all over the place from side to side. If the belt moves too much in one direction it could expose the paper to the fuser instead of the belt, but your marks look like they’re several inches long, so that theory is a bit of a stretch. Worth a second look at the fuser assembly and belt though.
 
Update
2nd BTRs with 607K in the serial may have been the culprit. They are in a taller box and come with adapter kits for the V80. Apparently they have been superseded, but are still in circulation. Luckily I had one 859K series on the shelf. I'll update in a few thousand clicks.
 
Update
2nd BTRs with 607K in the serial may have been the culprit. They are in a taller box and come with adapter kits for the V80. Apparently they have been superseded, but are still in circulation. Luckily I had one 859K series on the shelf. I'll update in a few thousand clicks.
The extra bracket that comes with the 607K should have a stamp on the corner that says "20". That's the bracket (inlet chute) that should be on the BTR to use with your 3100. If you look at the same bracket that came with the 859K, it will be stamped with the "20". Keep the 607K and replace the bracket that came on it with the extra one in the box with the "20" stamped on in. I haven't received one of those versions in years but they are still used.
 

PressWise

A 30-day Fix for Managed Chaos

As any print professional knows, printing can be managed chaos. Software that solves multiple problems and provides measurable and monetizable value has a direct impact on the bottom-line.

“We reduced order entry costs by about 40%.” Significant savings in a shop that turns about 500 jobs a month.


Learn how…….

   
Back
Top