I am wondering what steps you would take if you were setting up, for the first time a CTP, Press and proofer.
We have a new CTP and EFI XF Proofer and need to fingerprint a 40" press. I know this is a very
complex subject but would like to hear how some of you have proceeded with this task.
1. Linearize and profile your Colorproof to your chosen inkjet device (i.e. Epson), using the Color Manager.
2. In the proofing workflow of the EFI rip, set the "source" profile to GRACoL 2006. That profile can be obtained on the internet or newer versions of Photoshop, if your Colorproof doesn't already have it. Part of the challenge is terminology. EFI (and other software) call this the "source" profile, which is correct in some sense, but it is often more intuitive to think of it as the target or destination profile. This confusing terminology was half the problem for me in the early days of understanding color management. At any rate, set the source CMYK profile in Colorproof to GRACoL 2006.
Now the proofer rip and device will produce a correct proof that you can use as a target for the press.
3. Make a proof of a one hundred step scale of each color, 1% to 100%.
4. Create a press test form that is a scatter of 13 step scales of each color, 5%, 10-90, 95%, 100%. Best to align these around the cylinder for consistency within each scale, in other words, the 5-95 in line with the same ink key. There is no need for imagery on this test form, it only adds subjective second guessing to a portion of the process that should be done strictly by the numbers. A form with imagery can be done later to verify results.
5. Make linear plates of your test form, no curves applied. Print where ink film thickness is comfortable. The press room can make that determination.
6. Take the resulting press sheet, and for each color, measure the scales with a densitometer (density, not LAB values--important) and record the values (write them down). Doing averages is a good idea, from different areas of each sheet, and from different sheets. Also a good idea is to measure relative (minus the paper).
7. For each step of each color, find the matching density on your proof, using the SAME measuring device (this makes the process one of comparison, eliminating absolute values and any difference between measuring devices). For example, if you measure the press sheet and find that cyan at 50% reads a density of .40, then search the 100 step scale of the proof and find which one is closest to .40 in density, for example, 46%. This tells you that to get 50%, you need to add 4%. Starting from linear as the base, that means 50% should be 54%, not usual with ctp sharpening. Do this with all steps of all colors, and you have the data to build plate curves, one unique curve for each color.
The main barrier to this technique is differences in overall density, say the proof shows cyan at 1.23 and your press sheet reads 1.35. That will of course skew an attempt to compare scales. I have found it works well enough to factor the reading accordingly, so the 100% press sheet numbers match the 100% proof numbers. Then use those factored values to search and locate the correct percentage square on the proof's 100 step scales.
I have used this technique to successfully create plate curves that hit on the first try, time and time again. This technique is also one of the reasons I favor G7, because it works on a similar principle, and I had employed the technique long before G7 arrived. So when it did, I was pleasantly surprised to find it agreed with my methodology (using density to calibrate).

")
 rg
rg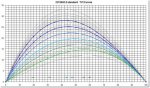
")