Printing same image (2UP) on sheet problem with print

wavedaveprint

Active member
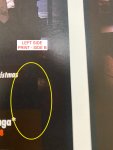
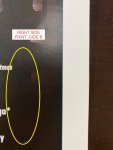
I am attempting to print a simple 8.5"x11" image (flyer) 2 UP, Duplex, 13"x19" sheet on Ricoh Pro C7210sx. Initially, we took the 8.5x11 PDF and imposed in Fiery and sent the imposed file to print. We noticed an issue in the print. Same exact image file, but the one on the left side of the sheet has noticeable problems. The right side print looks fine (see attached). I took the single PDF and imposed it manually in InDesign and sent the 2 UP PDF to print. Again, same issue as before. I've attempted different print settings in Fiery but nothing seems to work.

Does anyone have any idea what could be happening here? Could it be the printer?

Thanks for your time.
IMG_0734.jpg
 

Attachments

  • IMG_0735.jpg
    IMG_0735.jpg
    720.6 KB · Views: 558
  • IMG_0736.jpg
    IMG_0736.jpg
    711.2 KB · Views: 574
  • IMG_0737.jpg
    IMG_0737.jpg
    696.6 KB · Views: 582
Are there slightly different versions of black that break at arbitrary edges that do not correspond to the edges of any elements in the PDF? I think that's what I'm seeing. Our Fiery does that all the time but thankfully it has never been noticeable. If you rasterize (process and hold) then you should be able to see it in Image Viewer (you may have to turn black off and on in the preview).

I would try creating a black image (try CMYK 60/40/40/100) and using that as the background rather than a vector rectangle. If the Fiery still decides to mess with it, try reducing the black to 99%. If the Fiery still messes with it, try adding a very small amount of noise.
 
Do you a picture of the whole sheet? Is it two sided? Is the area with the defect on the trailing edge?
 
The only way I've ever been able to solve that problem is to open the file up in Adobe Photoshop and flatten the whole file
. Drives me crazy because I know flattening it that way makes the text slightly less sharp but it seems to be better than the alternative.
 
I'm putting my bed on components of the RIP being faulty. Memory, motherboard or connection cables are not in order some how. Have your techs take a look at it.
 
That's a transparency issue. I can see the box of red ghost behind the word view as well. Without knowing how the file was created or saved it's tough to diagnose. Flattening transparency should fix it. Could be a rip setting-did you contact Ricoh?
You could rotate the file-if the problem is in the same place, it's the press, if it's the file it will be wrong no matter how you spin it. Good luck.
 
Are there slightly different versions of black that break at arbitrary edges that do not correspond to the edges of any elements in the PDF? I think that's what I'm seeing. Our Fiery does that all the time but thankfully it has never been noticeable. If you rasterize (process and hold) then you should be able to see it in Image Viewer (you may have to turn black off and on in the preview).

I would try creating a black image (try CMYK 60/40/40/100) and using that as the background rather than a vector rectangle. If the Fiery still decides to mess with it, try reducing the black to 99%. If the Fiery still messes with it, try adding a very small amount of noise.
It looks like the designer used a lot of gradients and there are definitely some transparency issues. Unfortunately, no native files so all I've got is the PDF to work with. Thanks for the tip, though!
 
The only way I've ever been able to solve that problem is to open the file up in Adobe Photoshop and flatten the whole file
. Drives me crazy because I know flattening it that way makes the text slightly less sharp but it seems to be better than the alternative.
I flattened the file in Photoshop as you suggested and that did the trick! And there's nothing in the image quality noticeable enough to make further adjustments. Thank you so much for your help! It's much appreciated.
 
Checking the "Adobe Print Engine Preferred" Box will sometimes fix weird issue like this but, if it doesn't then flattening is the only option I've found.
 
I flattened the file in Photoshop as you suggested and that did the trick! And there's nothing in the image quality noticeable enough to make further adjustments. Thank you so much for your help! It's much appreciated.

I usually only notice a quality issue on smaller text, especially business cards. We have this issue all the time with the xerox printers. I have two versant 2100s and it does it more on one than on the other and the techs can't sort it out. It seems to happen when there is a transparent image over another solid color. I've tried every setting in the printers and in the fiery to make it not do it, the flattening in photoshop is the only thing I've ever been able to get to solve it.
 
Last edited:
I don't understand. How did you minimize the issue by flattening it when it wasn't appearing in both instances of the image?
I don't quite understand it either but it seemed to work. I didn't understand what was happening in the first place as it's exactly the same image side by side on the sheet. I flattened the image in Photoshop, saved as .psd, placed image(s) in 13"x19" document (imposed 2 UP), saved PDF and sent to the printer. For whatever reason, doing that got rid of the problem.
 
in the world of Litho Printing we would call this a "ghost" and i think treating as such might help? looking at area like heat in stock and stack. whats side prints first? turning the sheet, and allowing max drying and print the side with most coverage 1st?
 
I don't understand. How did you minimize the issue by flattening it when it wasn't appearing in both instances of the image?
I've had issues before where the frame containing a gradient was stepped but the gradient inside the frame was still starting in the original XY position, so I was getting a whole different area of the gradient in the second image. No clue why it happened or how to fix other than flattening before stepping.
 
I've had issues before where the frame containing a gradient was stepped but the gradient inside the frame was still starting in the original XY position, so I was getting a whole different area of the gradient in the second image. No clue why it happened or how to fix other than flattening before stepping.
I feel like with our J75 we would experience this issue with 1/1000 files, but with our Versant 180P we haven't seen any issues really at all. If I remember correctly your solution was mine as well. It had something to do with certain elements of the project being imported incorrectly from Illustrator to InDesign.
 
Flattening the image is the best idea for solving situations like this especially in a pressuring environments. Some older versions of Coreldraw does this a lot when creating a drop shadow on top of a powerclip images.
 

PressWise

A 30-day Fix for Managed Chaos

As any print professional knows, printing can be managed chaos. Software that solves multiple problems and provides measurable and monetizable value has a direct impact on the bottom-line.

“We reduced order entry costs by about 40%.” Significant savings in a shop that turns about 500 jobs a month.


Learn how…….

   
Back
Top